Merlin Project Express Help
Download, Test & Subscribe
Welcome!
Thank you for using Merlin Project Express - the little brother of Merlin Project - offering a basic key features set for project management.
This is the Merlin Project Express documentation for the Mac.
It will help you get off to a flying start, providing you with basic and further information.
Help and support
Use the built-in help in the Help menu.
|
|
For further help and support, please visit the Support section on our website: www.projectwizards.net or email our support team support@projectwizards.net. |
System requirements
Merlin Project Express requires an Apple Mac with Intel processor and macOS 10.13 as a minimum.
Installation and trial period
Visit our website. This is where you will find all our products and further information.
Click Merlin Project Express.
14-day trial
Try Merlin Project Express for free and without restriction. The first time the program is started, the following message will appear.

The trial period allows you to test Merlin Project Express in full for 14 days starting from when you first launch the program.
During your 14-day trial period a notification will be displayed on the top right of the program window. This tells you how many days remain of the trial period.

At the end of the trial period you’ll still be able to open and view project files, although you won’t be able to edit them. A subscription is required to edit projects again.
Subscription
If you start Merlin Project Express after the trial period, a Not licensed message will appear in the upper right corner of the main window.

If you click Not licensed, the following window will appear.
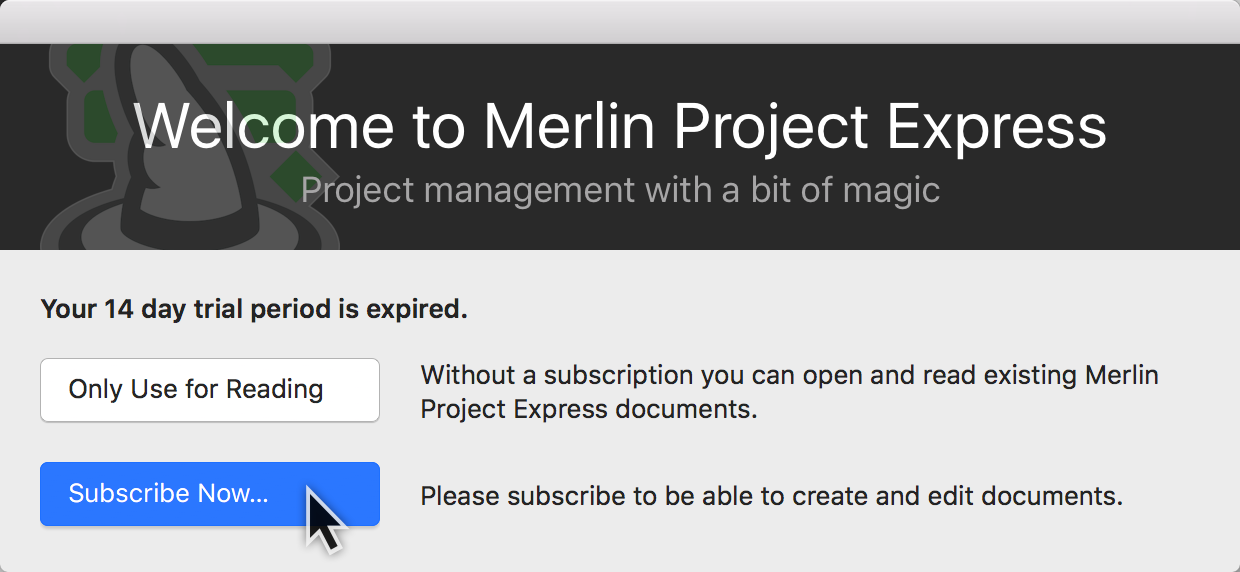
Click on Subscribe Now… to open the Subscription panel.
Click Only Use for Reading, to use the application to open and read existing Merlin Project Express documents.
|
|
The Only Use for Reading option does not allow opening files of third party formats or the use of templates. |
Subscribe Now…
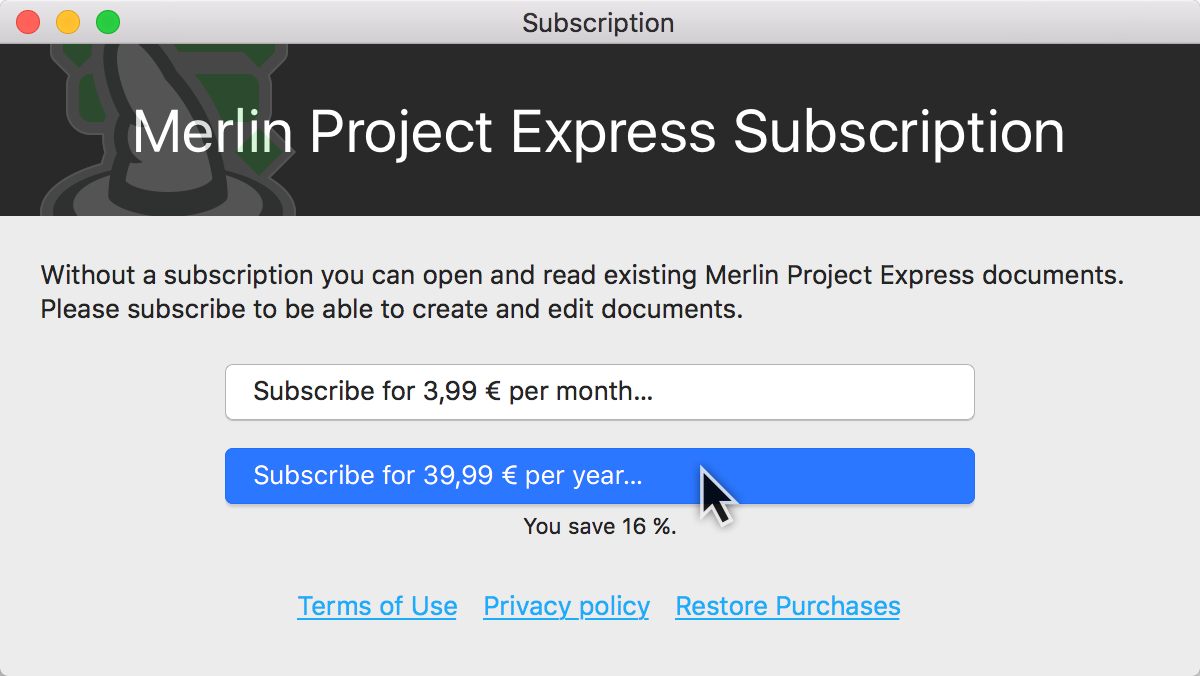
Your subscription will be billed by the service you subscribed from, i. e. App Store or Setapp. For information on your running subscription, click on Manage Subscription

|
|
You can cancel a running subscription at any time and start a new again whenever needed. |
New projects
The following guide will help you get started with new projects.
Opening a new project
When Merlin Project Express starts without an open project, or when you call File > New… following window will be displayed:

To create a new empty project, click the Empty Document button.
To start a project out a specific template, select the template and click the Create button.
To open an existing project, click the Open existing document button and select the file.
Recently opened files are listed in the Recent Documents area.

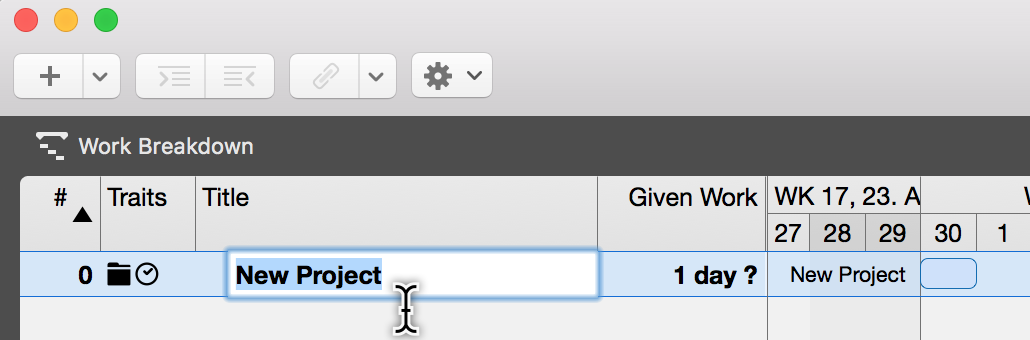
Naming your project
Name your project. To do this, double-click New Project in row #0 of the outline and give your project a new title.
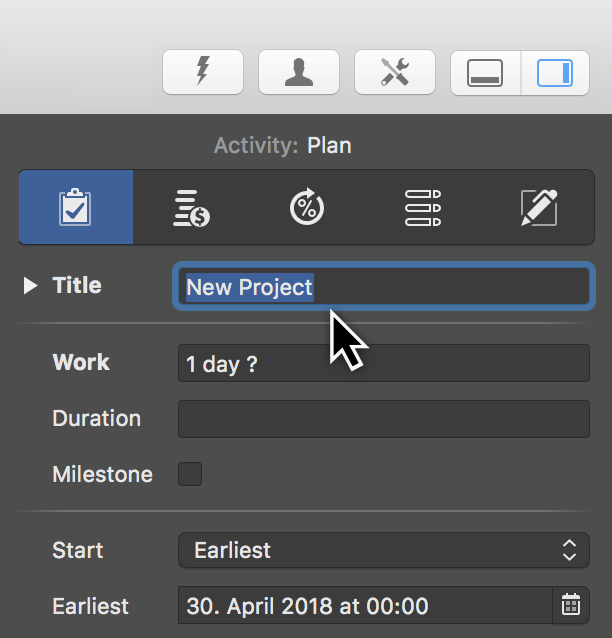
Project Inspector
Display the Inspector by clicking row #0 (the project). It contains a number of options for the selected project. Here you can also change the title and start date of the project.
|
|
Each Inspector has multiple tabs containing further options. When you select elements, as in this case row #0, the corresponding Inspector always appears. |
Setting the project’s direction
You can plan a project forwards or backwards. If you’ve already got a fixed end date for the overall project, you can also take a backward-looking approach. To do this, in your project click Settings and set the Direction to »Backward«.

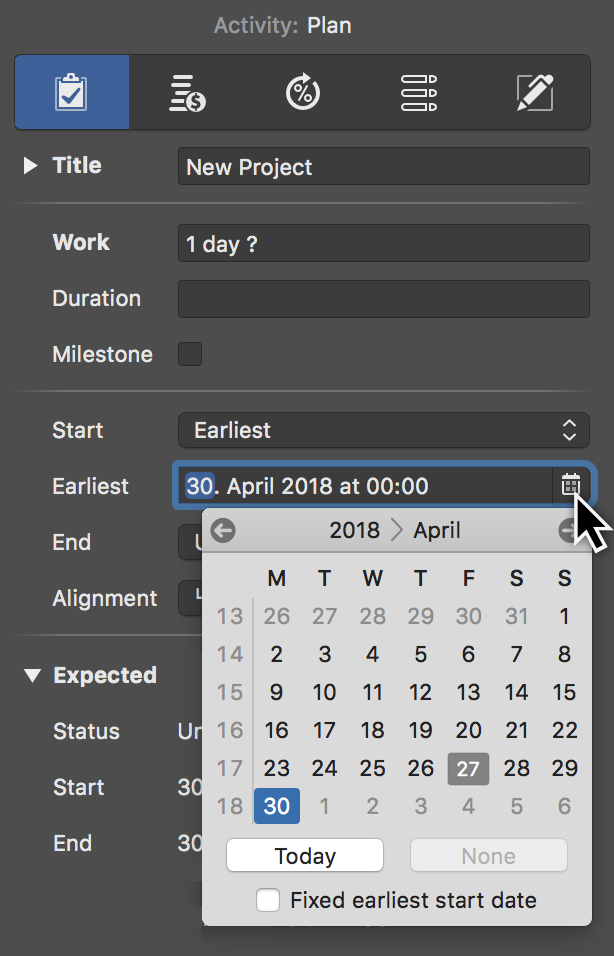
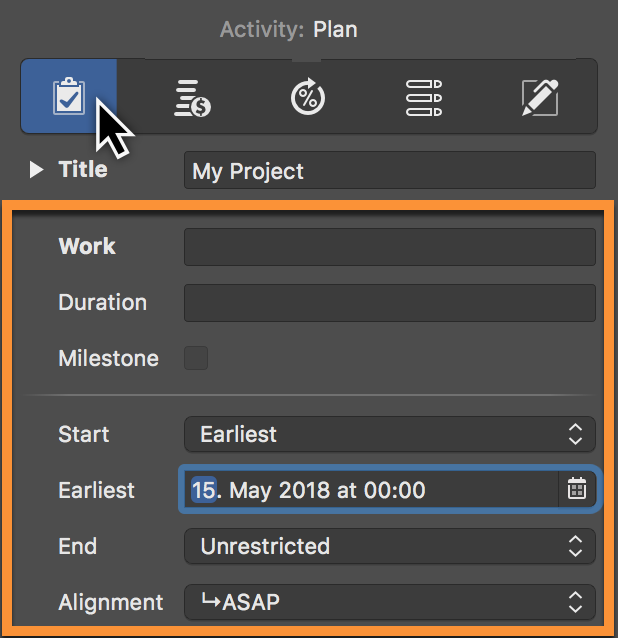
Start Date
In the Inspector, click the Calendar icon in the Start > Earliest field. Use the calendar to set the earliest planned start for the project.
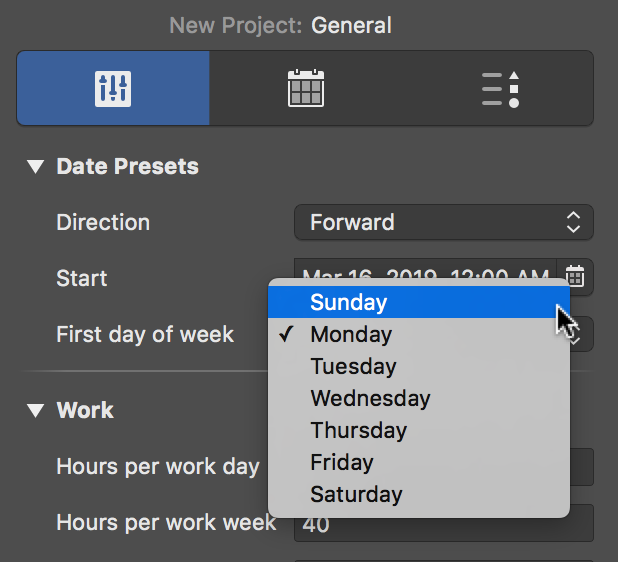
First day of week
Per default you’ll find Sunday to be the first day of week for new projects. To change it, just select another day in the Settings > General > Date Presets. You may need to do this for projects taking place abroad, for instance.
Regular working times
Working times are configured in the settings for each project. Click the Settings icon (1) and then the Calendar tab (2).

The Inspector shown here contains calendars for the Regular Week and Exceptions, such as vacation time and extra working time.
Click the Regular Week tab:
The default calendar is active (checkbox ticked). Further calendars are available in the list and can be configured as project calendars.
|
|
By clicking the plus or minus icons you can create new calendars or delete existing ones. |
Click one or more (while holding down the cmd key) weekdays and then click the Work intervals to change the calendar settings.
|
|
The calendar settings have a direct impact on project planning and the working time in the active project. |
The exceptions work according to the same principle. Read more about this in the Non-working Time guide.
Views
In Merlin Project Express there are two views for your project:
The views support the Dark Mode, available in macOS Mojave or later.
|
|
Even if using the app in Dark Mode, printing always takes place in the light appearance, while image exports take place in the currently selected appearance. |
Merlin Project Express shows in the upper left corner the name of the current view.
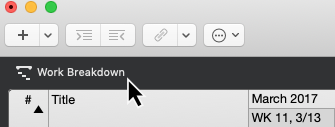
Switching views
Switch to another view, by selecting another item from the view list.
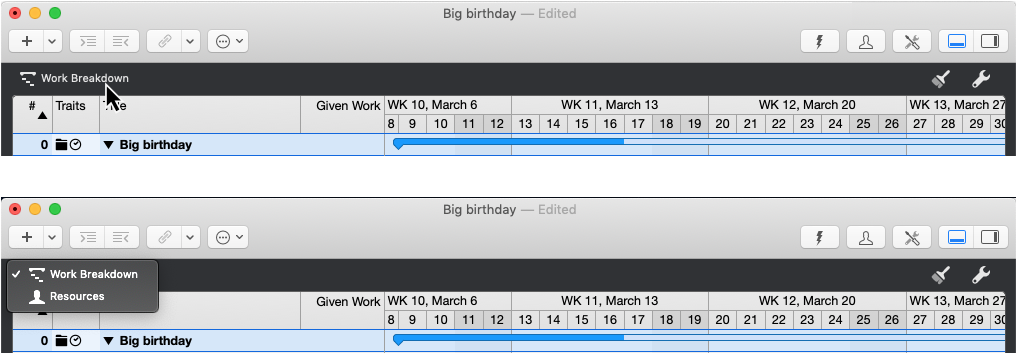
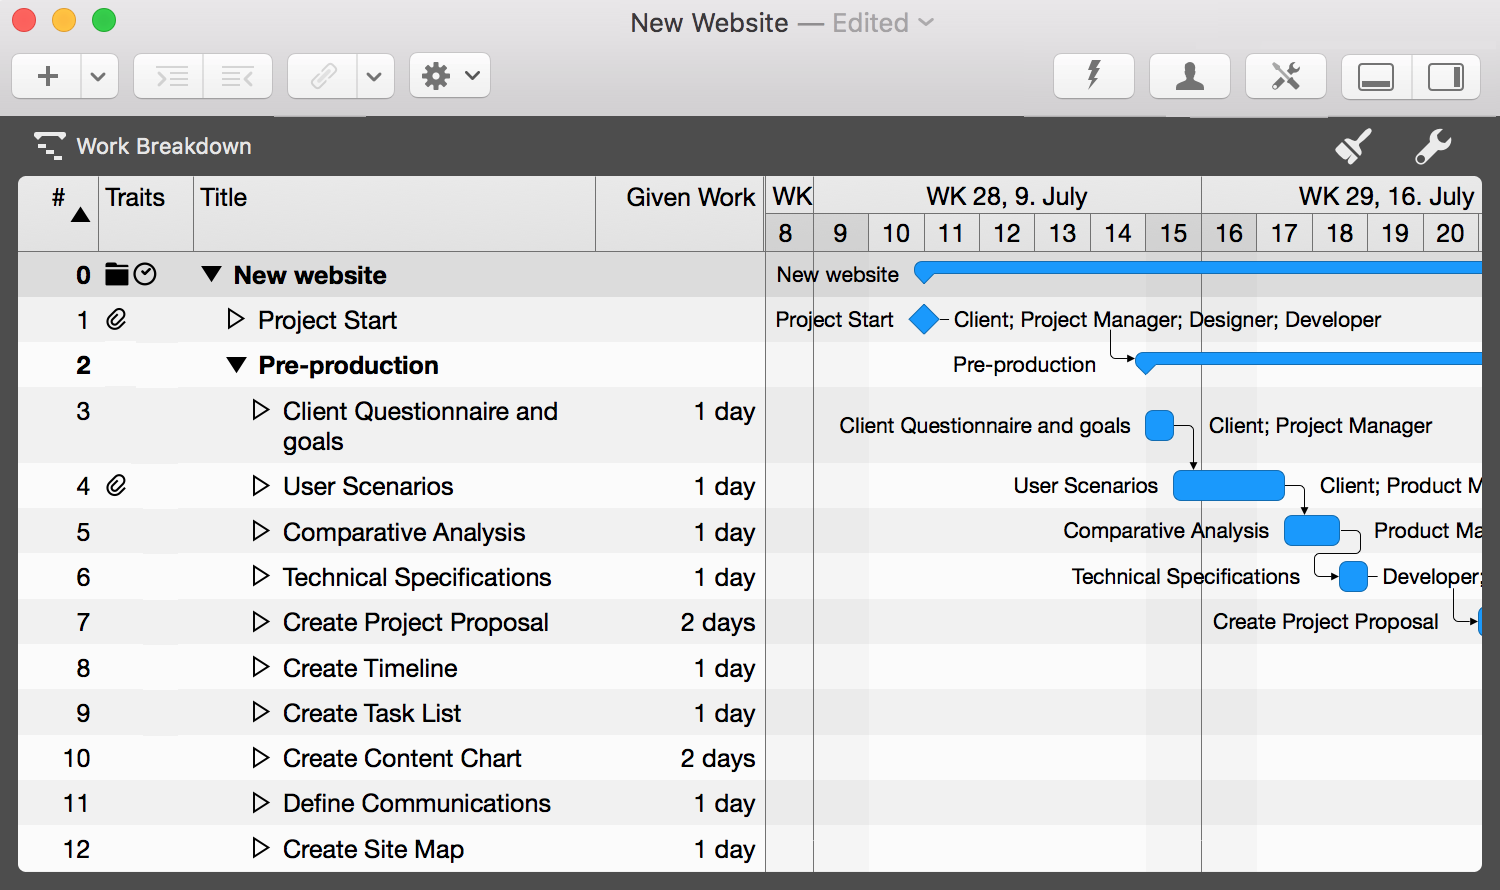
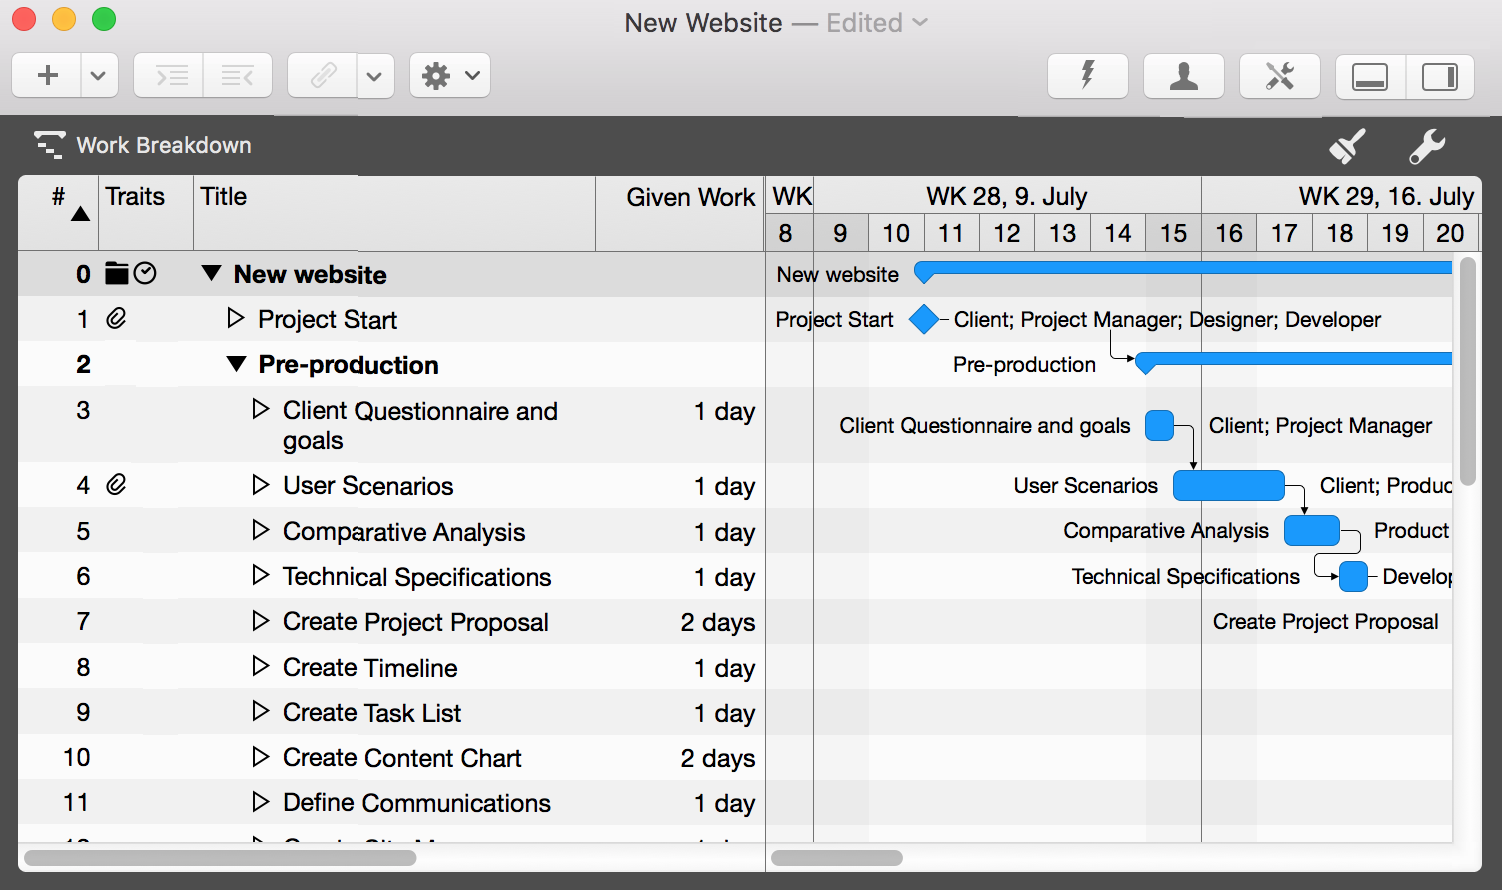
Work Breakdown
Typically, a Work Breakdown representation with an Outline and a Bar Gannt chart is used in project management.

Resources
The Resources view contains all resources involved and assigned in the project. This gives you an overview of the resources available in the project.

Attachments
The Attachments view provides an overview of all file attachments in the project.

To show or hide it call the according toolbar icon.

View Options
The layout of the current view can be changed and graphically adjusted in the View Options. To do this, click on the wrench.

Depending on the selected view, this inspector is context sensitive and contains different options.
Inspector »View Options: Work Breakdown«
Following inspector appears when the Work Breakdown view is enabled.
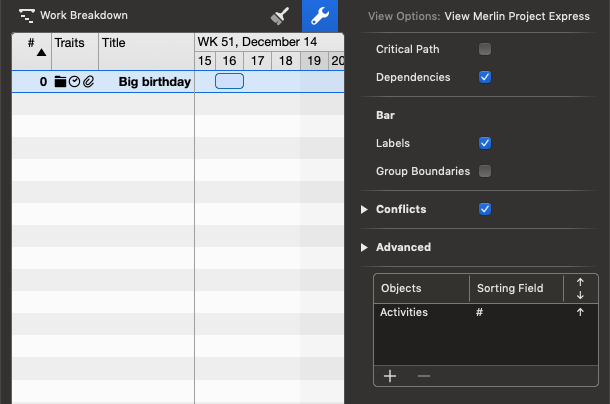
It contains the following options:
Inspector »View Options: Resources«
This inspector appears when the Resources view is enabled.

It contains the following options:
Inspector »View Options: Attachments«
This inspector appears when the Attachments view is enabled.
It contains the following options:
View Options in detail
Critical Path
The Critical Path option enables/disables the display of the critical path in the Gantt chart. Here, the dependency lines between the operations are highlighted graphically.
The display of the Critical Path can also be activated by clicking the corresponding icon on the toolbar.

|
|
The critical path is always present when the linked tasks influence the end of the project. Any change to one of the linked tasks on the critical path automatically leads to a change in the end of the entire project. More information about the critical path can be found at Wikipedia.. |

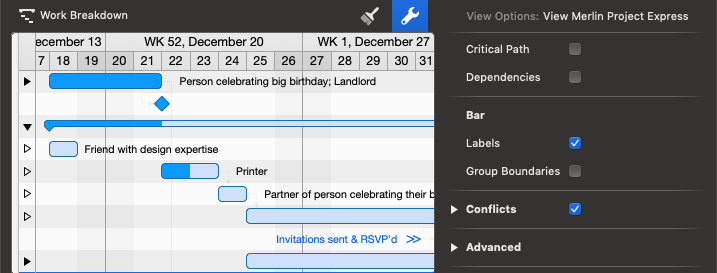
Dependency Lines
The Dependency Lines option is available in the View Options of the Work Breakdown view.
With it you can activate or deactivate the display of the dependency lines between the Gantts bars.
Bar
The Bar options section is available in the Work Breakdown view and affects how bars are displayed in the Gantt chart.

The Labels option enables/disables the bar labels display.

Up to three labels can be defined per Gantt element in the styles.
Group Boundaries
The Group Boundaries option enables/disables the display of graphical boundaries of groups in the Gantt chart.

|
|
The Group Boundaries option increases the clarity of groups and subgroups. |
Conflicts
These options allow to control the display of Conflicts in the Work Breakdown.
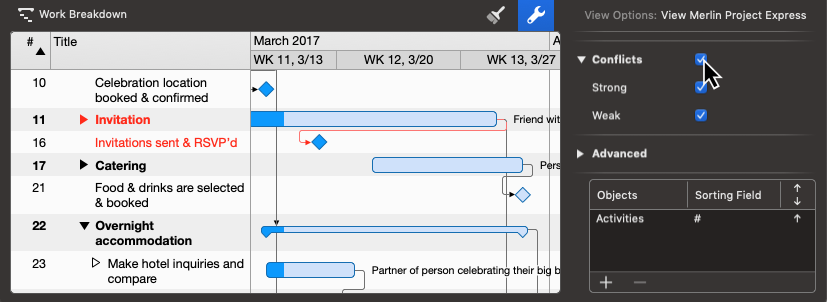
The Conflicts option enables/disables the display of all possible planning conflicts.
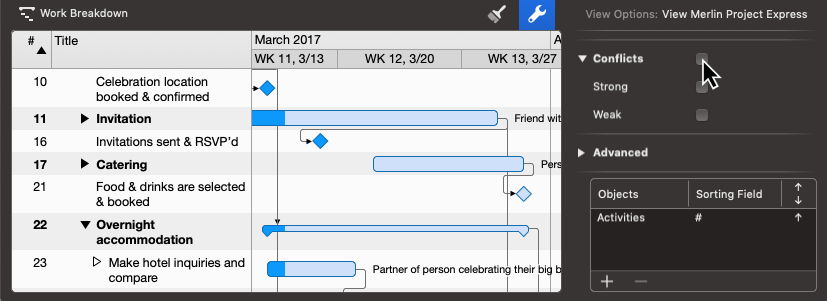
Expand them if you want to display Strong or Weak Conflicts differently.
The Strong option enables/disables the display of possible strong planning conflicts.
The Weak option enables/disables the display of possible weak planning conflicts
You can learn more about what Conflicts are and how to resolve them, here.
Advanced
The Advanced section contains advanced View Options.
Highlight Changes
The option Highlight Changes activates/deactivates the highlighting of the last changed values. This highlighting is only effective for the display and will not be printed.
Details in secondary View
The option Details in secondary View defines whether the information of the Details view refers only to the current selection of the main view or to the entire project.

|
|
Disable this option if you want the Details view to show information for your complete project. |

Selection-dependent Styles
The Selection-dependent Styles option enables/disables the display of styles depending on the selection.
Dimming non-editable fields
The Dimming non-editable fields option turns on/off the display of calculated fields in gray.
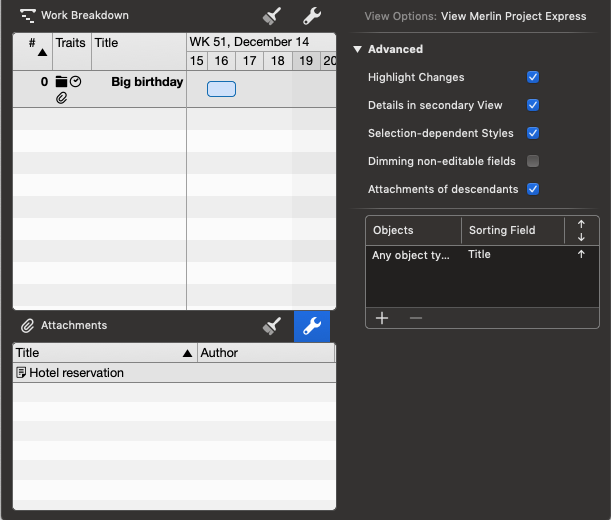
Attachments of descendants
The Attachments of descendants option is available in the View Options of Attachments views. It controls the display of attachments in the detail view if the project window is configured as a main view with a detail view.
If this option disabled, and you select a row in the main view in which some attachments are defined, the Attachments Detail view will show these attachments.
If this option is disabled and you select a row in the main view in which no attachments are defined, the Attachments Detail view will not show any attachments.
If this option is enabled and you select a row in the main view where attachments are defined in its substructure (in sub-activities or child activities), the Attachments Detail view will show the attachments of the substructure.
If this option is enabled, and you select a row in the main view where some attachments and in its substructure (in sub-activities or child activities) more attachments are defined, the Attachments Detail view will show the attachments of the selected row and those of the substructure.
Bundle adjacent lines
The Bundle adjacent lines option bundles the display of link lines in the bar chart. This makes the display of the links in the project more graphically appealing.
Gradients
The Gradients option enables/disables the display of color gradients if the Gradients style is enabled for bar elements of this view.
Shadows
The Shadows option enables/disables the display of shadows if the Shadows style is enabled for bar elements of this view.
Objects and Sorting Fields
This table can be used to sort the current view by specific fields in descending or ascending order.
A mouse click on the + creates a new sorting option.
Project content
Below you will learn how to create project content (activities, milestones and more) in Merlin Project Express.
Plus icon
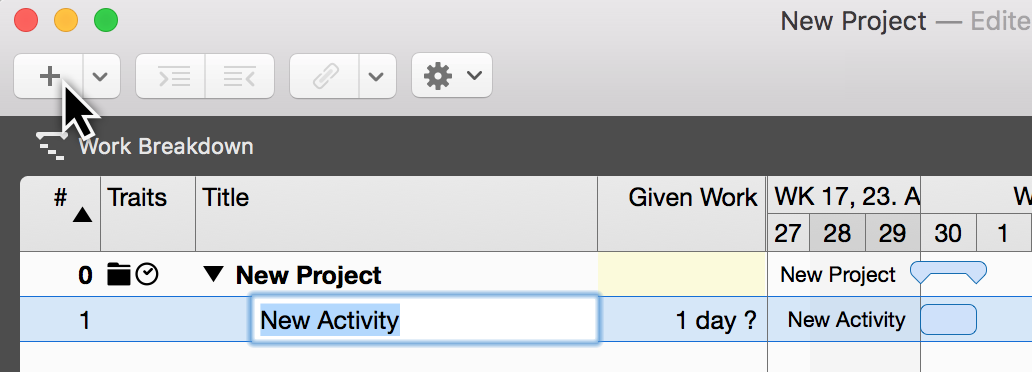
The easiest way to create new activities is to click New (the plus icon in the toolbar) or even faster with the keyboard shortcut cmd + N.
|
|
If you repeat the step several times, the activities appear in chronological order. |
Newly created content is activated and ready to be named. Add a title to the activity.
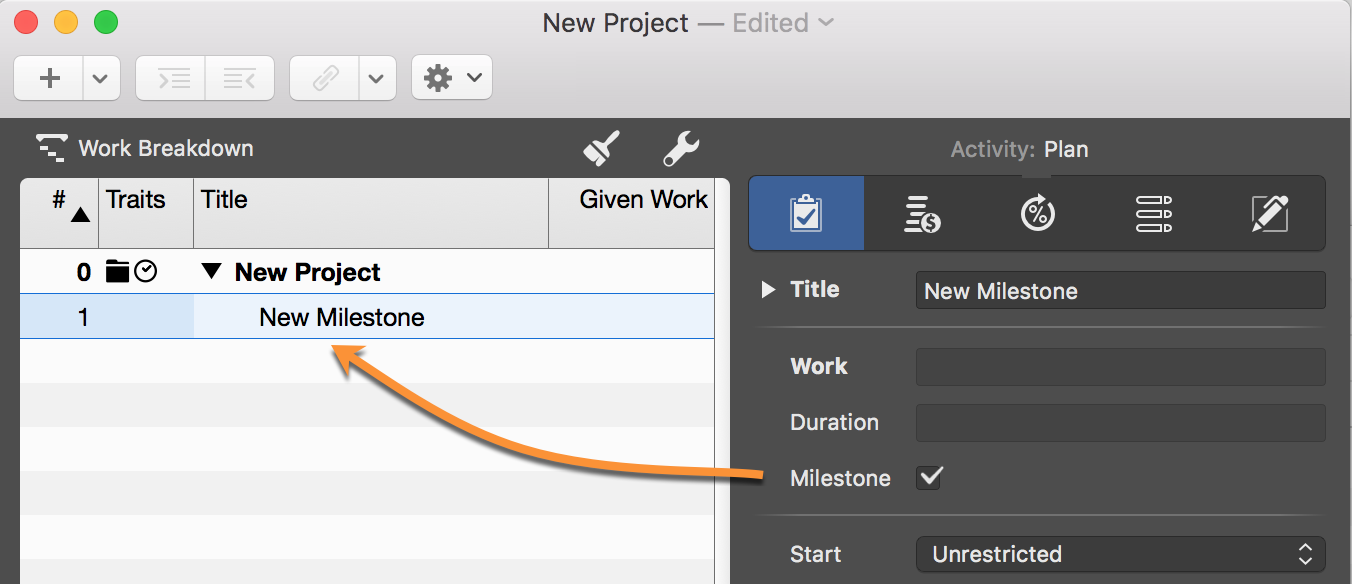
|
|
You can quickly convert an activity into a milestone. To do this, tick the checkbox next to the Milestone option in the Inspector. If you uncheck the box, a milestone will become an activity again. |
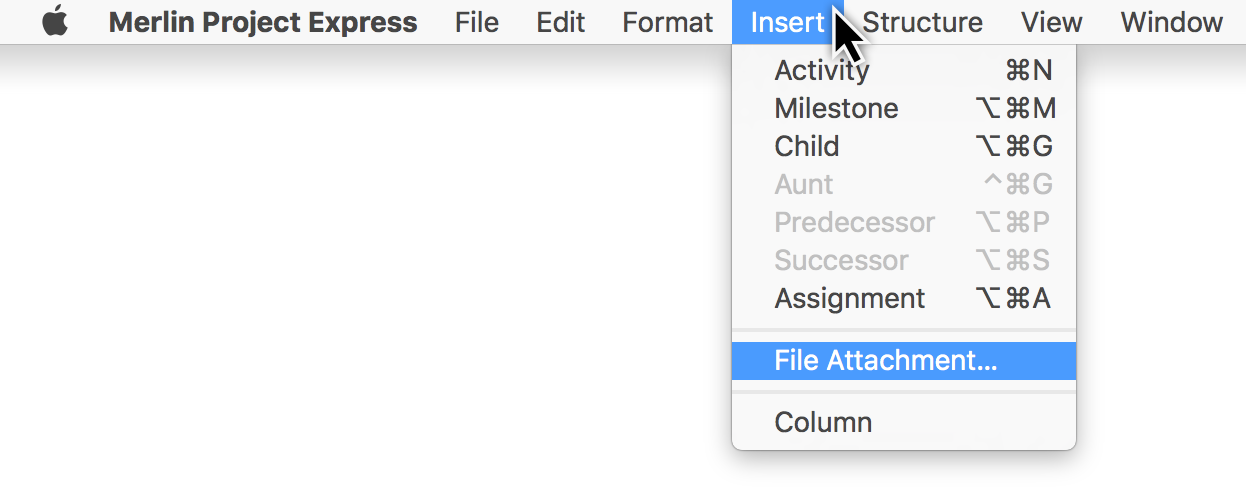
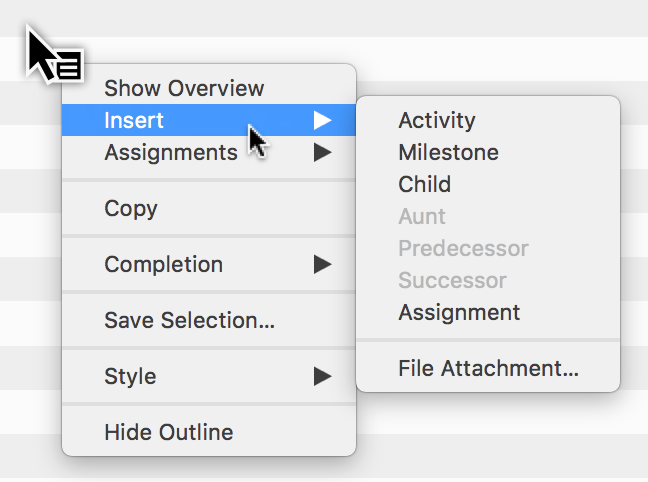
If you click the arrow to the right of the plus icon, a menu appears with further content for selection.

Depending on your current selection, you can create the following content:
-
Activity (creates an activity)
-
Milestone (creates a milestone)
-
Child (creates an indented activity)
-
Aunt (creates an outdented activity)
-
Predecessor (creates a link to the successor)
-
Successor (creates a link to the predecessor)
-
Assignment (creates an assigned resource)
-
File Attachment (allows you to attach a file)
-
Column (inserts a column into the outline)
|
|
The aunt option remains grayed out until an indented activity is selected at least one level down. Only then will an outdented activity be created using the aunt option. |
Insert menu
You can also create the content listed above using the Insert menu item.
Insert menu - context menu
In addition, the context menu shown can be called up in the view by performing a secondary-click. Among other things, it includes the Insert option.
|
|
New content is created beneath the current selection. If nothing is selected in the main area, new content is created beneath the last row at the end of the project. |
More content
A project needs content. This content can be inserted manually, copied from a template, the library or imported from different documents.
|
|
The Library is a feature existing only in Merlin Project, not in Merlin Project Express. |
Import
Merlin Project Express can open various file formats:
-
CSV text (recommended for import of EXCEL sheets)
-
ics (iCalendar files)
-
Merlin 2
-
Microsoft Project (.mpp files from MS Project 2003, 2007, 2010, 2013 and 2016 as well as XML and MPX)
-
MindManager / FreeMind / NovaMind 4 & NovaMind 5
-
Omniplan 2
-
OPML
-
Merlin Project XML
There are two ways to import new content:
File > Open
Call the File → Open… menu item. It opens existing documents. If the format of the selected document is supported, Merlin Project Express imports the content and opens it in a new document.

Drag & drop using the mouse
You can drag & drop a document directly onto the Merlin Project Express application icon or onto an existing project. Latter, imports the document into the existing project.
Content from templates
Project templates make working with recurring content easier. They are perfect for starting new projects quickly.
A large number of templates can be found in the File → New… (1) menu item.

You can save existing projects for later use as templates. To create a template of your own from a project, call the File → Save As Template… (2) menu item.
Work and duration
In Merlin Project Express you can schedule activities by work, duration, start and end date constrains.
Simply select an activity, use the Plan inspector and define your activity as required. Alternatively you can use related columns in the outline.
|
|
For flexible planning and easier adjustment throughout the life of your project, we recommend that you define as few start and finish dates as possible and as many as needed. |
Work
If you want to schedule your activity by the effort it will need to be completed, use the Plan inspector or enter the effort in the Given work outline column.
You want to schedule the painting of a room. You estimate the required effort for the activity as 2.5 working days. You expect that when assigning this activity to let’s say two resources, each resource’s effort will be half as much.
-
So you create a new activity.
-
Select it.
-
Check in Plan inspector.
-
Change the Work value to 2.5 days.
-
Leave the value in the Duration field empty.
|
|
You can adjust the Default Value '1 day ?' for work in Settings > General > Work The ? indicates that the value is estimated. Remove it when you are sure about the value or don’t need so much detail in your planning. |

Alternatively: You can edit the Given Work value in the outline column.
Duration
If you want to schedule your activity by the duration it will need to be completed, use the Plan inspector or enter the effort in the Given duration outline column.
You want to schedule a seminar. The duration for this seminar is 2 working days. You expect that when assigning it to your trainer personel, all assigned trainers will work throughout the complete duration of this seminar.
-
So you create a new activity.
-
Select it.
-
Check in Plan inspector.
-
Blank the Work value.
-
Enter 2 days in the Duration field.
|
|
You can adjust the Default Value for duration in Settings > General > Duration |

Alternatively: You can edit the Given Duration value in the outline column.
You schedule a team meeting on a remote location. You want to plan with 1.5 working days. But also need to block 3 working days of your team for the overall duration. Within those 3 days, your team transfers to the remote location, works for those 1.5 working days and transfers back to its base.
-
So you create a new activity.
-
Select it.
-
Check in Plan inspector.
-
Change the Work value to 1.5 days.
-
Enter 3 days in the Duration field.
You want to schedule an event for which you know it will be 3 calendar days long. It starts on Friday and the weekend (which is usually non working time) should be included in the overall duration.
-
So you create a new activity.
-
Select it.
-
Check in Plan inspector.
-
Blank the Work value.
-
Enter 3 edays in the Duration field.
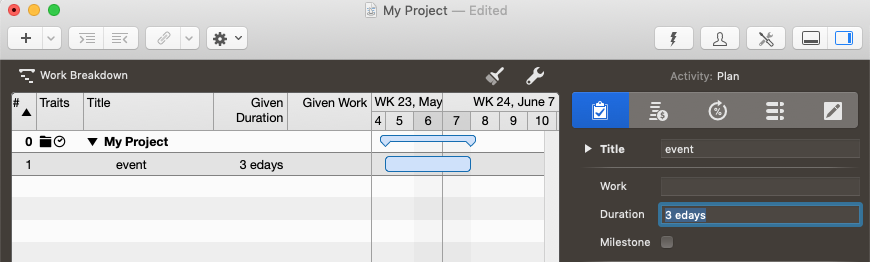
Alternatively: You can edit the Given Duration value in the outline column.
|
|
Such an event starting first thing on Friday and ending on first thing on Monday, includes only working times on Friday. If you want to adjust the included effort, modify the Work value accordingly. |
You want to schedule the placing of a concrete slab. You estimate the required effort for the activity as 1.5 working days. You know concrete starts drying directly as you pour it and requires at least 1 calendar week of overall drying time.
-
So you create a new activity.
-
Select it.
-
Check in Plan inspector.
-
Change the Work value to 1.5 days.
-
Enter 1 eweek in the Duration field.
Alternatively: You can edit the Given Work and Given Duration values in the outline columns.
Working times
In the above examples we used the terms working days, working week.
For simplicity reasons, we enter them in Merlin Project Express as '2 days' or '1 week'.
Let’s check the defaults in Settings > General > Work
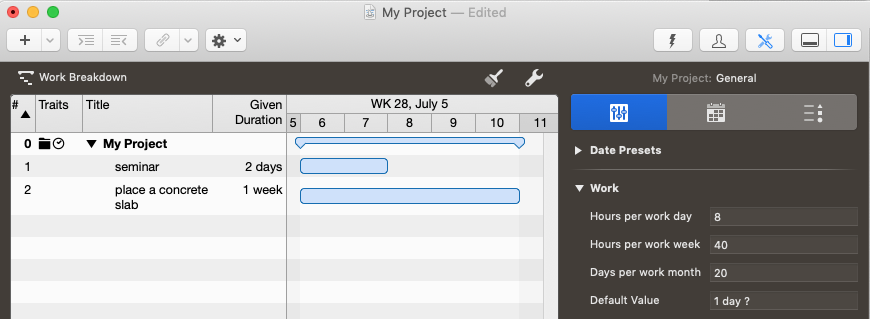
Per default, 1 working day are 8 working hours, 40 working hours make a week and 20 days a month.
So '2 days' are those '2 working days' of '8 working hours' each. '1 week' means '40 working hours' which calculates as '5 working days' or '8 working hours' each.
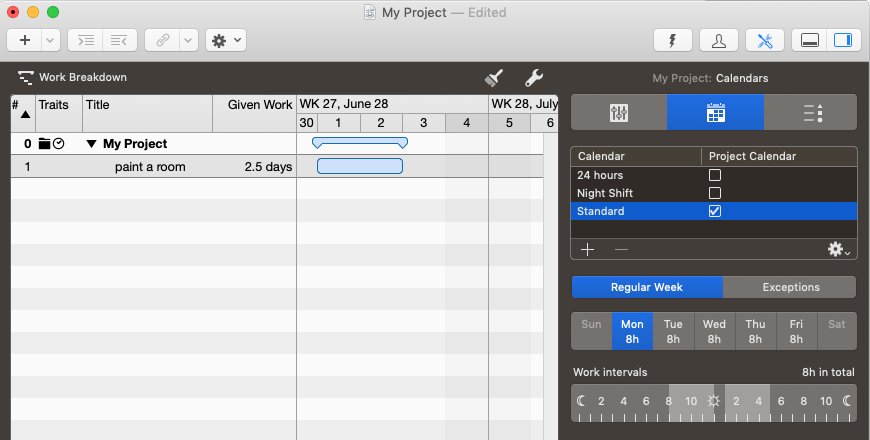
Let’s check the defaults Settings > Calendars
-
Select the calendar on which the checkbox Project Calendar is enabled
-
Check the Regular Week tab

Per default, there are 5 work days: Monday to Friday. Each work day includes work intervals from 8am to 12pm and 1pm to 5pm.
So the working time on Monday starts at 8am and ends at 5pm.
|
|
Should you choose to adjust your regular week or work intervals in Settings > Calendars make sure you also adjust your defaults in Settings > General > Work to match the new values. |
Let’s select an activity of '2.5 days' work and open the Plan inspector.
We see in the Expected

-
Work: 2.5 days
-
Duration: 2.5 days (2.17 edays)
We know that 2.5 days are 2.5 working days, 20 working hours. This activity has the same amount of effort and duration.
2.17 edays is the elapsed calendar time and time period to expect the activity to be completed. The prefix "e" denotes "elapsed".
The elapsed duration is the duration plus the free time contained.
By default and according to the settings (Settings > Calendars) a regular work day starts at 8am, contains a lunch break between 12pm and 1pm and ends at 5pm.
An activity with the planned 2.5 days of work, which starts at 8am requires for the first 8 hours (four in the morning, four in the afternoon) 9 consecutive hours (ehours) on the first day.
The works stop at 5pm and start next day at 8am. So there are 15 hours of free time. From 8am until 5pm on the second day there are further 8 hours (9 ehours), until once again at 5pm 15 hours of free time start again.
The remaining 4 hours can be scheduled on the third day to start at 8am and finish at 12pm. So to the 20 hours of work, you add 32 hours of free time which calculates as 52 ehours.
52 ehours divided by 24 ehours equals 2.16666 edays, or 2.17 edays.
Should you change the Calculation Unit to Hour in Settings > General > Duration …

And select again your activity, you’ll see expected values in hours thus:
-
Work: 20 hours
-
Duration: 20 hours (52 ehours)

Project structure
It’s a good idea to group activities together to structure your project. This gives a clearer picture of the individual project phases.

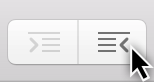
Indent
The indention of activities in the outline creates groups and, if required, further indented child activities (children) and child groups automatically.
Indenting to another level creates a child activity and a resulting group automatically.

The activity above the indented content becomes a group automatically, which is identifiable graphically by the group bar.
|
|
A project is always a group and, like all groups, can be expanded and collapsed using the small triangle. |
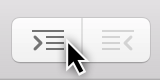
Outdent
The outdent icon moves activities out of a group and its child groups.
Select one or more activities and then click the outdent icon.
Outdenting is only active if the selected activities or milestones are already in a group. An outdented activity is called an aunt.
|
|
You can indent multiple selected activities/milestones. Additionally, you can use your mouse to nest activities in other activities or indent or outdent activities in the levels using the Structure → Indent or Structure → Outdent menu item or the corresponding keyboard shortcuts cmd + → or cmd + ←. |
Link and connect
This guide shows you how to create dependencies in Merlin Project Express.
Why link
The aim of linking content in a project is to define the sequence in which the activities are worked through logically.

Example: Only when Activity A is completed can Activity B begin. Activity A is the predecessor of Activity B, which is its successor.
Creating links
You can link project activities. When linking, dependencies are created that define a logical sequence.
Select at least two activities that you want to link together.

On the toolbar you will find the Link button. If you click the arrow to the right of the Link icon, the available link types and the option to separate existing links appear.

Click the Link icon or use the keyboard shortcut ctrl + cmd + L for the End to Start dependency type. The two activities are now linked with an arrow.

Alternatives
All roads lead to Rome, including the various possibilities for creating links.
Menu and context menu
In the Structure → Link menu item you will find the same options.

|
|
Secondary-clicking selected content will display the context menu. This contains the dependency option with the four dependency types. |
Linking using the mouse
You can also link activities in the Gantt chart using your mouse. Press and hold the alt button while hovering the mouse pointer over an activity bar or milestone.

A small black dot appears on the activity. While holding down the alt key, move the mouse to another activity (successor).
The dependency will be created as soon as you release the mouse button.
Linking with columns
In the Predecessor or Successor columns, you can see the predecessor or successor activity numbers (#).

Enter an activity number in the Predecessor or Successor columns, to create a dependency of the current activity row to that number.
|
|
The Successor column is not activated by default. |
Disconnecting links
To disconnect links, click a link line and press the delete key.

If you need to delete several links, select all activities and use the Disconnect option in one of the Link menus.
Dependency Inspector
If you select a link, the Dependency inspector appears.
The options contained in the Dependency inspector are responsible for the dependency of linked activities, groups, and milestones.
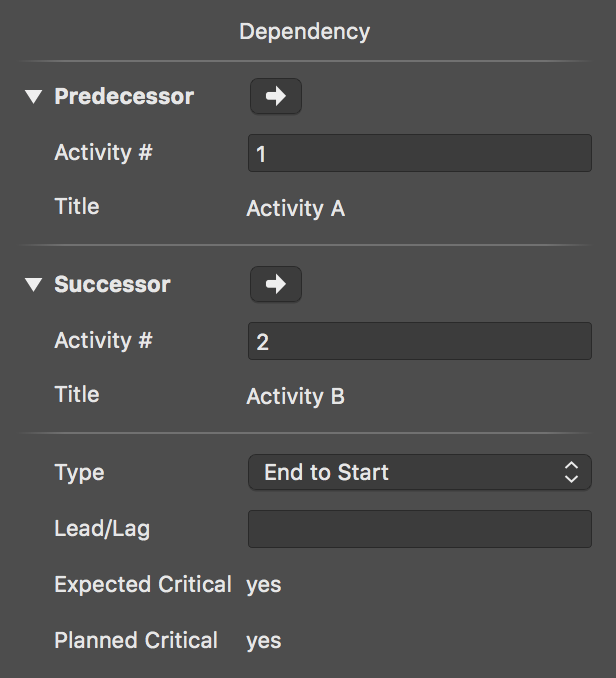
Here you can modify the predecessors and successors, and find them quickly in the project by clicking the arrow.
In the Type drop-down menu, you can select the dependency types. This lets you change the current dependency:
-
End to Start
-
End to End
-
Start to Start
-
Start to End
Lead/Lag in links
Click a link line to access the Dependency inspector.
Enter a time unit in the Lead/Lag field to lengthen the dependency between the linked activities.
If you enter a negative value, the dependency and the linked activity will move back along the timeline according to the entered lag value. For example, enter -2 days in the Lead/Lag field.
|
|
Lead/Lag can be entered manually in the Predecessor or Successor columns. |
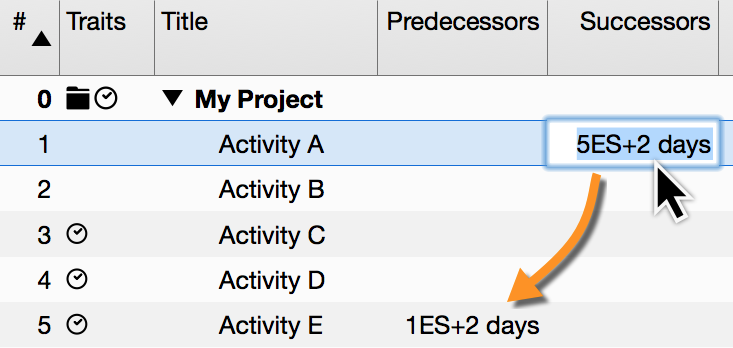
Example: If you enter the value 5ES+2 days in the Successor column for an activity, an End to Start dependency will be created with the Activity #5 and a lead/lag of 2 days.
At the same time, the Activity #5 will be also linked to Activity #1 by a lead/lag of 2 days. Its Predecessor column will show then: 1ES+2 days
Resources
This guide shows you how to create resources and assignments in Merlin Project Express.
What are resources
Resource is a term for people, materials and equipment used in the project.
Merlin Project Express offers the following resource types:
-
Person (involved in the project actively or inactively)
-
Material
-
Company
-
Equipment
|
|
The default resource type is Person. |
Creating resources
The Resources toolbar icon opens a pop-up window listing all resources in your project.
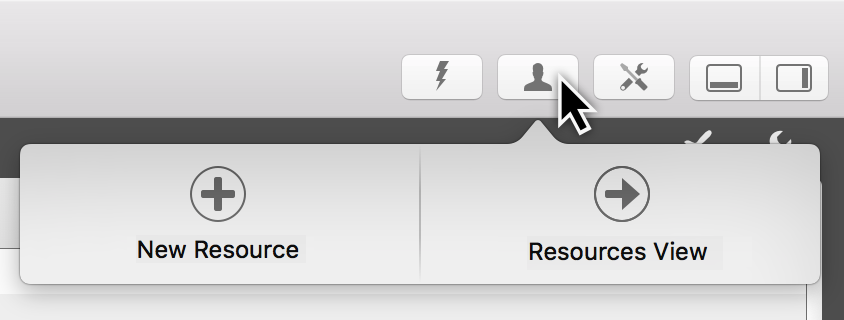
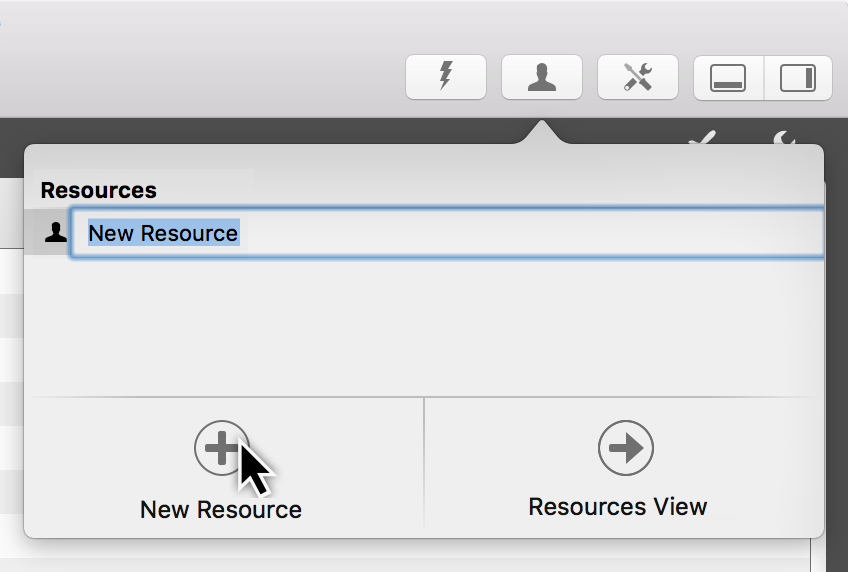
You can quickly create new resources in Merlin Project Express by clicking New Resource in the pop-up window.
Using resources pop-up
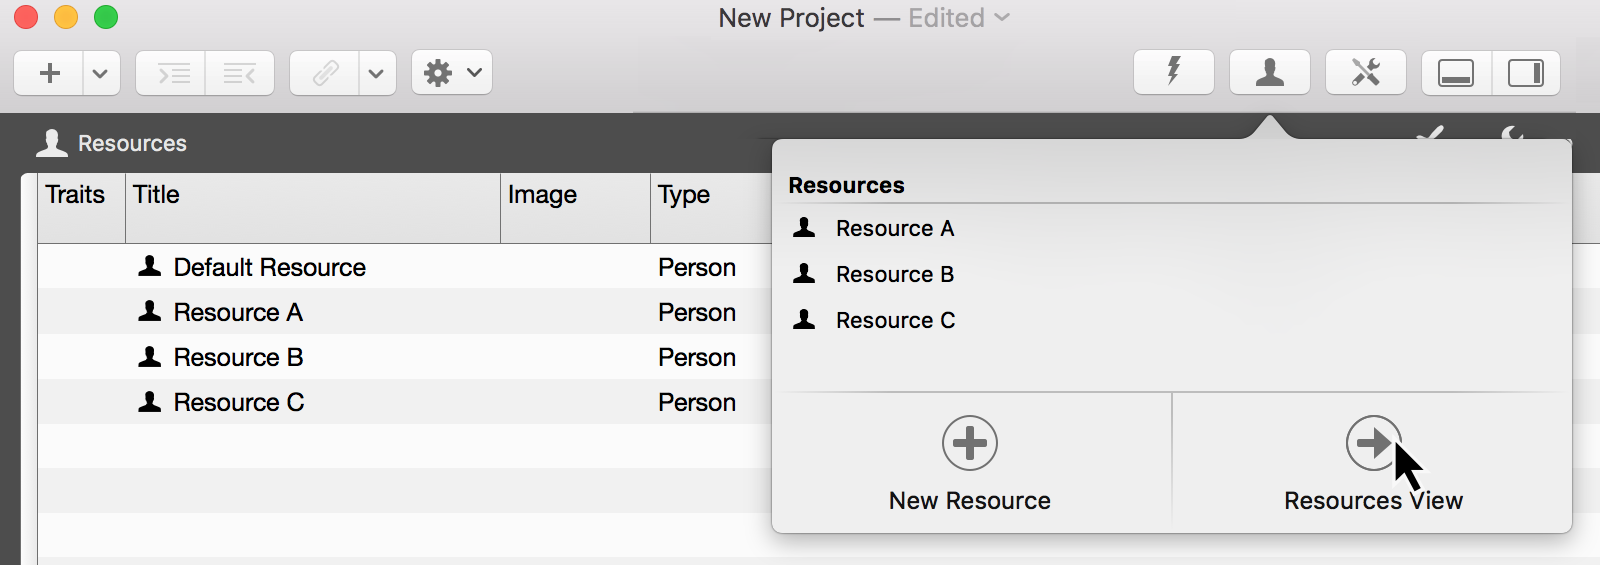
The resources pop-up is perfect for gaining a quick overview of project resources.
For more information on your resources and for a more detailed edit of the values of your resources, click on Resources View. Merlin Project Express will switch quickly to that view.
|
|
Switch to the Resources View to insert an image for your resource, thus… |
The resources pop-up can be used as a separate window. Move the window down with the mouse pointer.
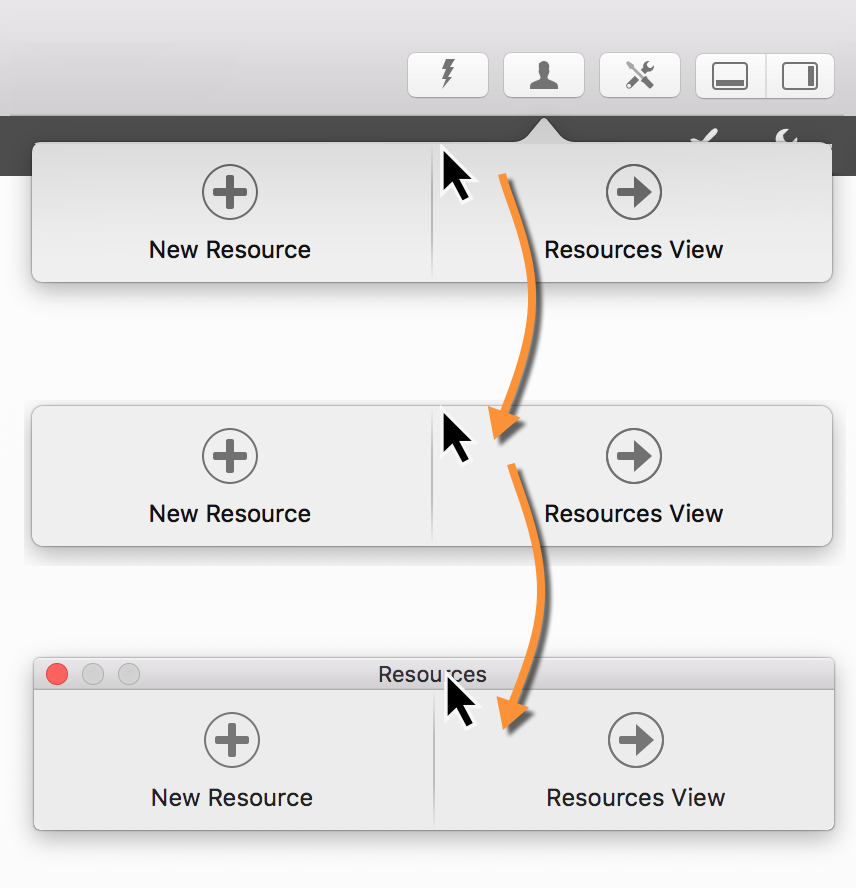
|
|
You can quickly show or hide the resources pop-up as a separate window using the F4 key or via the Window menu item. |
Creating assignments
Move a resource from the resources pop-up to an activity, group, or milestone. An assignment is created automatically.
|
|
A resource assigned to an activity is called an assignment. This resource works on the activity assigned to it in the project. |
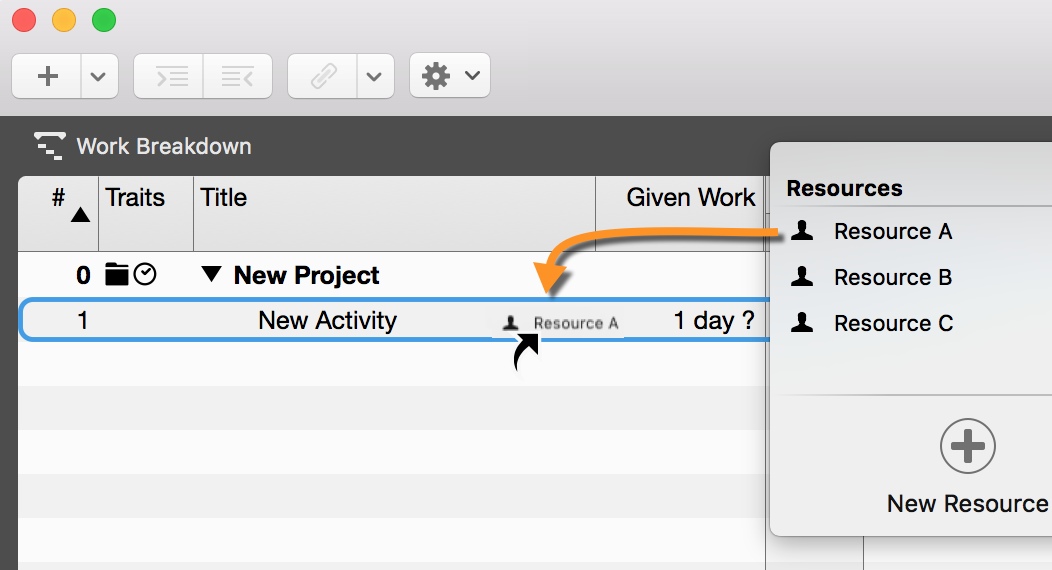
The assignments are identifiable by the white triangle. Multiple assignments can be created for an activity and these share the work automatically.

For selected activities in a view, the Assign option appears in the resources pop-up. This allows you to add additional resources as assignments to the activity quickly by marking the check box.
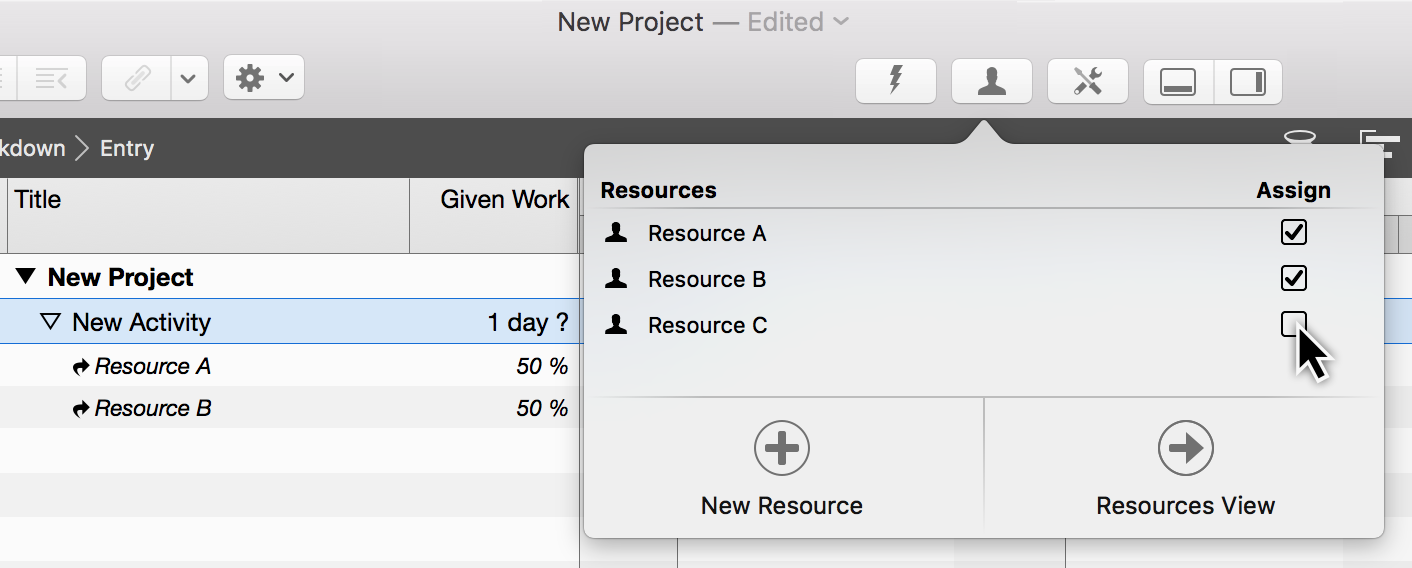
If the checkmark is removed, the assigned resource is also removed from the activity.
|
|
You can create new assignments for the selected activities automatically using the Insert → Assignment menu item or the corresponding shortcut option + cmd + A . |
Time scale
What is the time scale
The time scale is the display of time in the Gantt chart. The default time scale contains two tiers, the upper and the lower one.
In the time scale Inspector, you can make a range of adjustments to the time units and other options.
Time scale Inspector
Click a row in the time scale to open the corresponding Inspector.
There you will find a range of options for adjusting the clicked time scale and settings for Non-working Time.
|
|
The selected time scale is shaded blue. The options only apply to this selected tier of the time scale. |
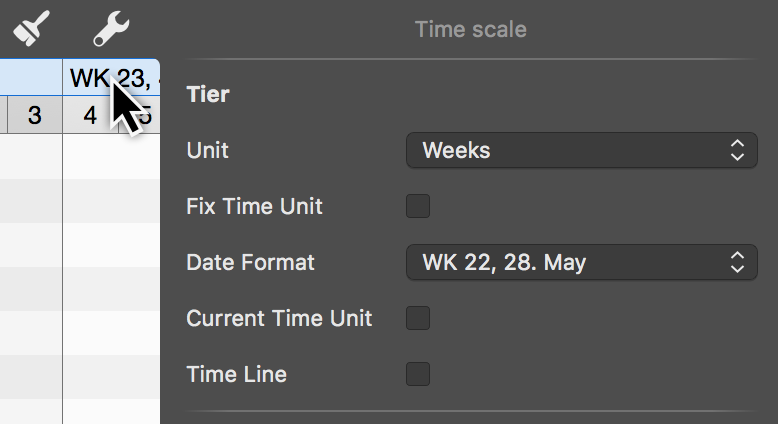
-
Unit (Minutes / Hours / Days / Weeks / Months / Quarters / Years)
-
Fix Time Unit (fixes the selected Gantt unit and preserves it even when zooming the view)
-
Date Format (absolute and relative formats for displaying the units, e.g. from project start or end)
Current Time Unit

If you enable the Current Time Unit option the time unit in the Gantt chart which contains the status date, will be shaded blue. This gives you an additional highlight on the Gantt of the project, to quickly visually identify the tasks that are due during this period.
Time line

Similar to the Current Time Unit option, the Time Line option allows you to add a vertical marker to the Gantt chart.
If you check the Time Line option, the status date will appear as a thin red line on the project Gantt.
|
|
The status date updates automatically by default and shows the macOS date and time, but can also be set in the project settings if required. |
Time scale context menu
Secondary-click the time scale to display the context menu.

Add Top Tier
The Add Top Tier option lets you insert one more tier to the time scale.
|
|
The time scale can show up to four tiers. |
Remove Tier
The Remove Tier option lets you remove the selected tier from the time scale.
|
|
The time scale requires at least one tier. |
Adjust Scale to Fit Labels
The Adjust Scale to Fit Labels option adjusts the width of all active time scale columns automatically.
The available space on the time scale is set automatically to the best width.
Zoom In / Out
The time scale is enlarged or reduced according to the selection.
The content of the time scale grows or shrinks with it. The time units are adjusted automatically as required.
Fit Project
The Fit Project option adapts the time scale to the project.
The entire project is zoomed into until it fits into the visible area. The time scale grows automatically with it.
Fit Selection
The Fit Selection option adapts the time scale to the activities selected in the project.
The selection is zoomed into until it fits into the visible area. The time scale grows or shrinks automatically with it.
|
|
At least one activity, group, or milestone must be selected in the project for this option to be active. |
Complete Work as of
The Complete Work as of sets all activities contained in the project to the status Completed up to the date clicked in the time scale.
This makes it easy to determine the progress of the project just by clicking.
Style
The Style option changes the graphical appearance of the time scale.
|
|
For more information on style options, see the Styles and contents guide. |
Non-working time
Non-working time is grayed out in Merlin Project Express. For example, the weekends in the project calendar are darkened by default.

Click the time scale. In the Inspector you will find three options for adjusting the non-working time.
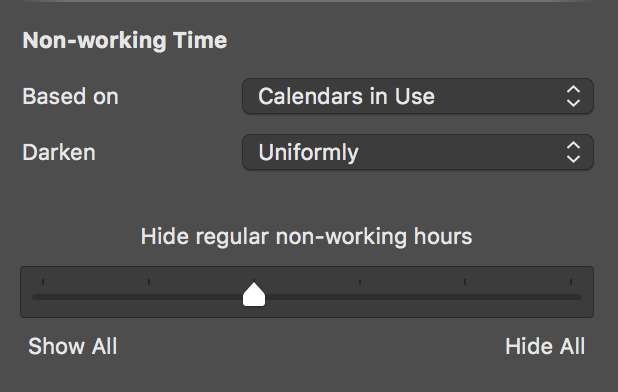
Based on
The Based on option lets you display the calendar based on its non-working time in the project.
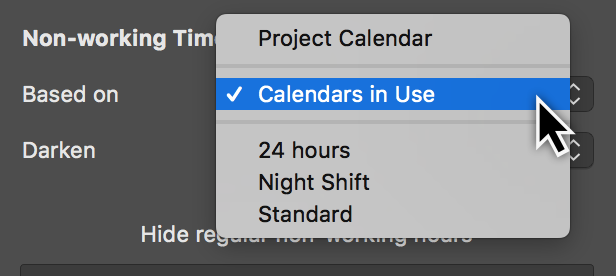
|
|
By default, the project calendar is preset as the base calendar for non-working time. There are further calendars to choose from in the drop-down menu. The calendar settings are located in the project settings and can be edited there. |

Darken
The Darken option has three configurations to control the display of non-working time in the project:
-
None
-
Uniformly
-
Individually per row

The Never option stops darkening the display of non-working time in the project.
The Uniformly option is set by default. The non-working times for the regular week in the project are displayed.
Activate the Individually per row option so that you can see the non-working times of resources and their vacation periods in the project in the respective row.
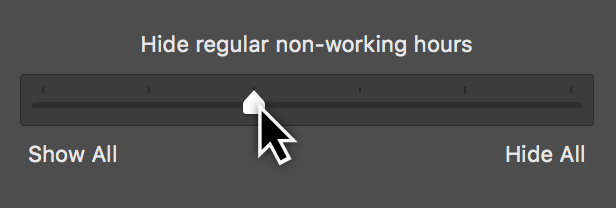
Regular non-working time
Using the slider, set whether you want the regular non-working times to be displayed or hidden.
Choose from the following options to display the working times:
-
Show All
-
Hide all regular non-working minutes
-
Hide regular non-working hours
-
Hide all regular non-working days
-
Hide all non-working days
-
Hide all non-working times
|
|
The effect of the slider setting depends on the selected zoom level in the active view. |
Styles and contents
This guide contains information on using and modifying styles and contents in Merlin Project Express.
What are styles?
Styles let you change how elements (bars, groups, milestones, columns, timescales, etc.) are displayed in the views to suit your preferences. You can do this using the style options for view elements, such as to change the format of colors, borders, shadows, or fonts.
What are contents?
Contents let you store a range of project information in the view, for example in the labels (to the left and right of the bars and on the bars themselves) or in the Cards of the Net Plan or Kanban view.

Style and Content Inspector
The Style and Content Inspector gives you control over styles and contents in a couple of mouse clicks.
You can access the Style and Content Inspector quickly by right-clicking an element in the active view and going to the associated context menu.

|
|
Depending on the element you right-clicked, either the Style option on its own or the Style and Content option will appear in the context menu. The selection options they include open the associated options in the Style and Content Inspector. |
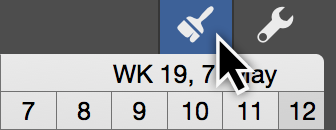
There is also a new way to access the Style and Content Inspector by clicking the paintbrush icon.
Elements are displayed graphically in the Style and Content Inspector.
Depending on the active view, you can see schematic displays for bars/groups or cards there.

Using the Inspector
Click an element to access the style or content options. In the above drop-down menu, you can see the selection you made and the selected element will be highlighted in blue.
Style
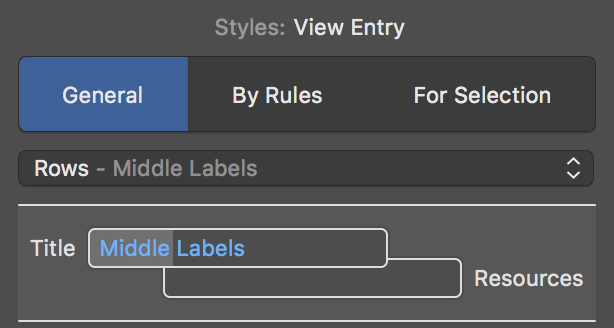
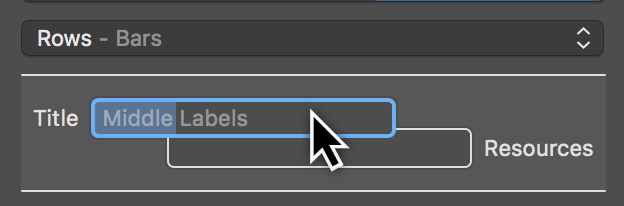
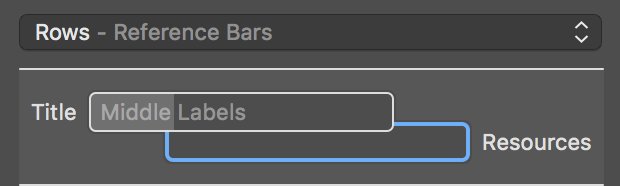
In the following, the Bars (1), the entire Row (bar row type) (2) and the Reference Bars (3) are activated.
1
2

3
Content
Activate the left label by clicking Title and changing the content of the left label using the option in the drop-down menu with the same name. You’ll also find style options here for modifying the Color and Font of the content.
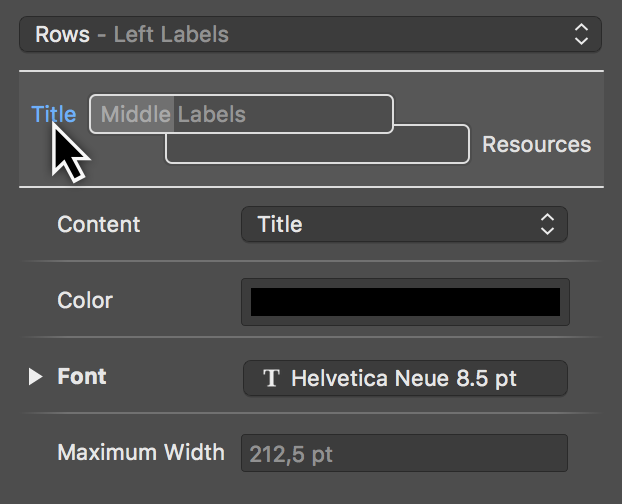
From the Content drop-down menu, select the Expected Start instead of the default Title selection. This will display the expected start of the activity as a date in the left-hand label.
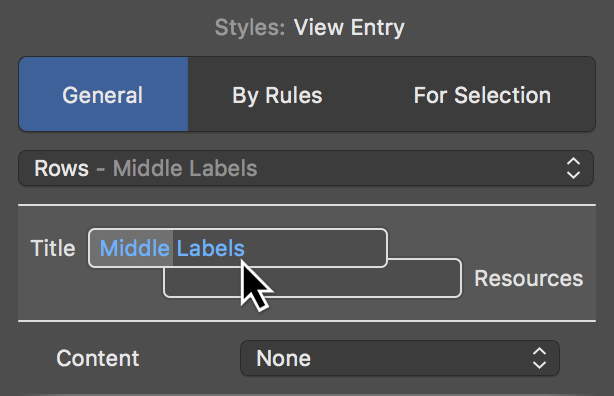
General
The General tab controls the styles for the display of many general elements in the active view.
If no selection is active in the view and you click the magnifying glass icon, the Style Inspector will open with the General tab.
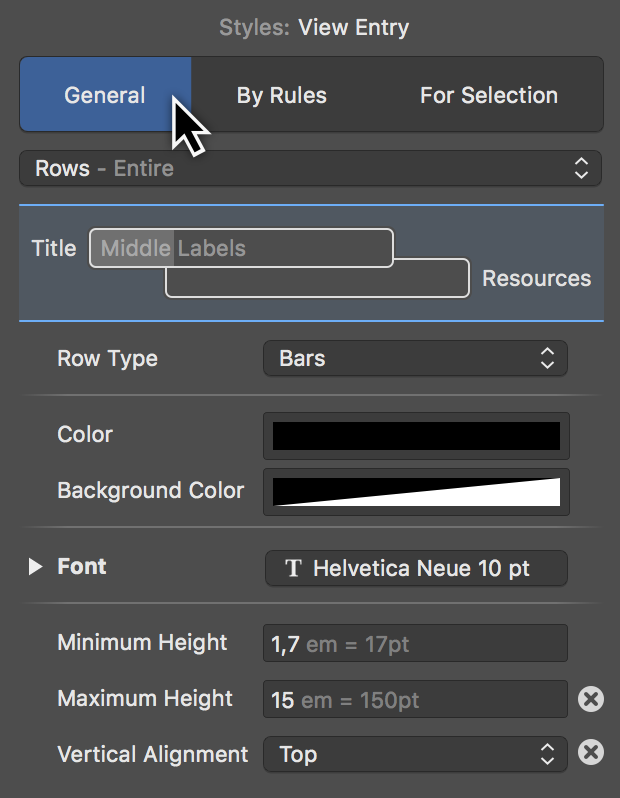
The general settings for Style and Content apply in principle to all style options across the project.
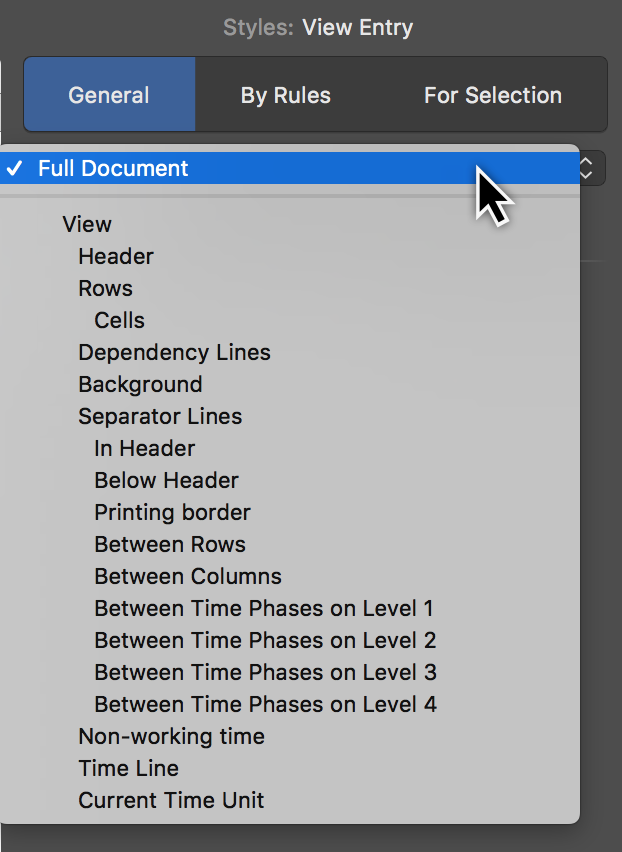
The elements for the particular view, which you can configure to suit using the options available in the Inspector, can be found in the drop-down menu.
By Rules
The By Rules tab lets you control style and content options automatically depending on specific conditions.

For example: You want all activities to which a specific resource has been assigned to appear in a specific color or alternate font automatically.

|
|
In "Merlin Project" you can define your own conditions. "Merlin Project Express" does not support this option. |
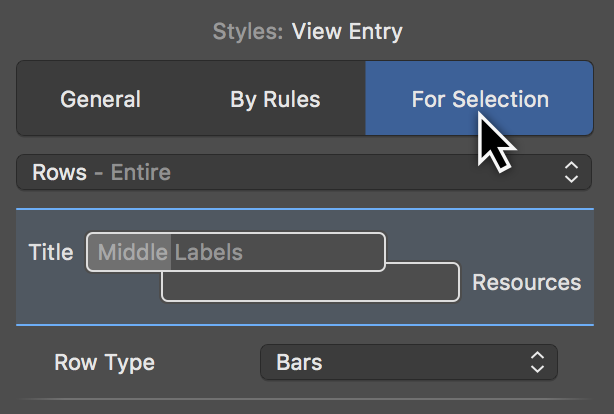
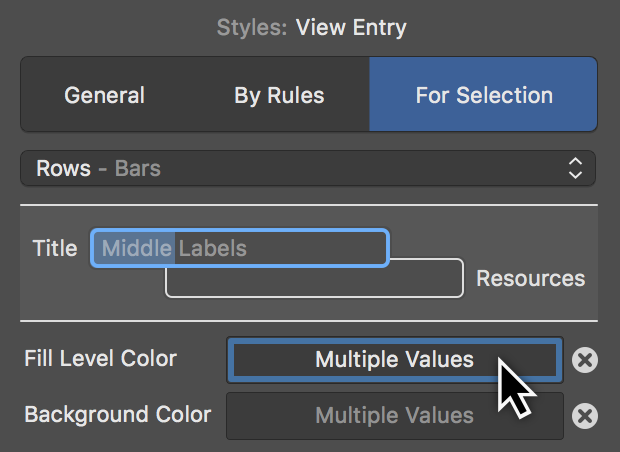
For Selection
The For Selection tab controls the styles and contents for the selection. This lets you adjust elements individually.
In a view, select an element and click the paintbrush icon. The Style Inspector will open with the Selection tab.
|
|
In principle, you can control styles and content by right-clicking and selecting the option Style or Style and Content from the context menu. |
Work Breakdown selection
Right-click a bar in the Work Breakdown view, a column row, or the Outline to access and edit the associated style and/or content options.

-
(1) Outline text style and content options
-
(2) Column row style options
-
(3) Outline style options
-
(4) Timescale style options
-
(5) Bar, milestone, and group style and content options
-
(6) Gantt chart style options
Style and content examples
Here is a small selection of practical examples.
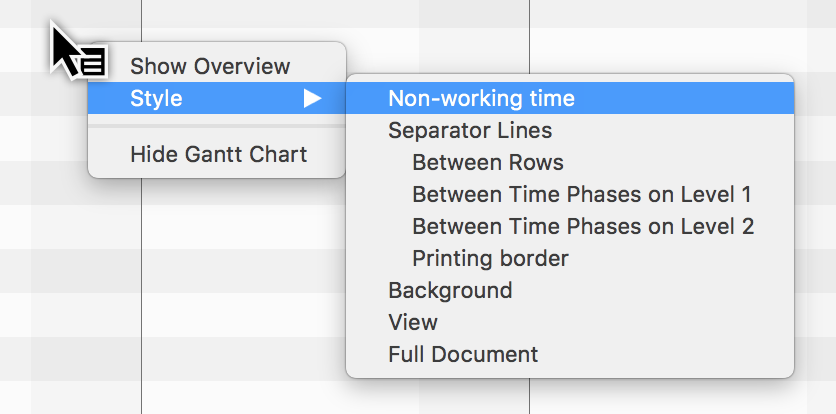
Example 1: Modifying the color of non-working time
Right-click Non-working Time (6) in the Gantt chart and in the drop-down menu click the option Style > Non-working Time.
|
|
Alternatively, you can also click the paintbrush icon and then in the General tab select Non-working Time from the drop-down menu. |
The General tab will open in the Inspector with the style option for Non-working Time.
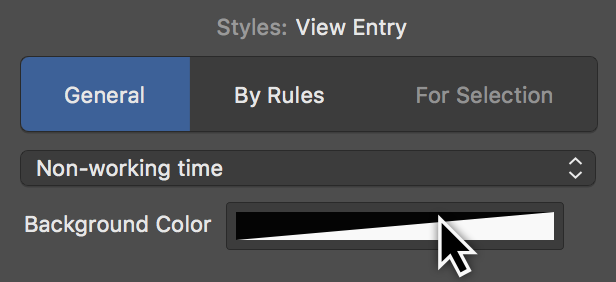
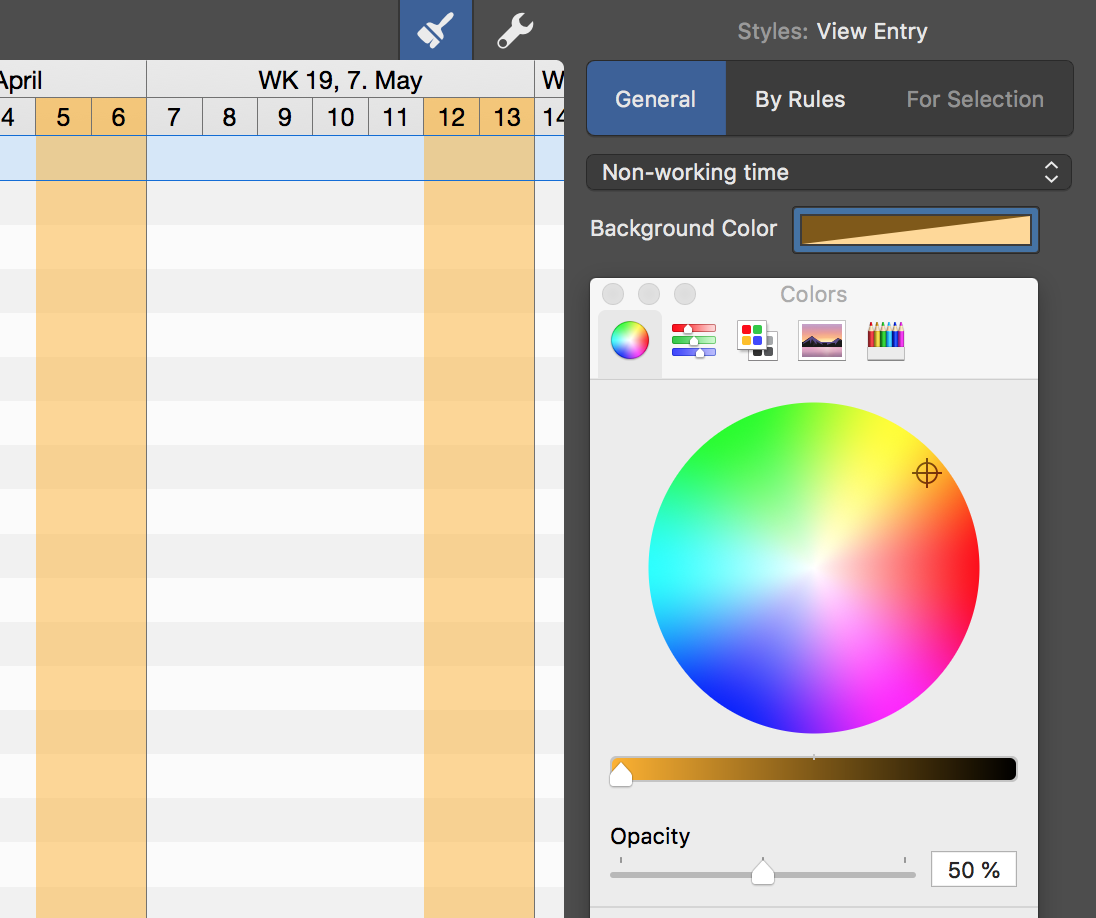
Click the Background Color color well to change the display color of the Non-working Time in the Gantt chart.

The macOS Colors window will then appear. This includes a range of options for setting colors and the opacity.
|
|
Learn more about macOS’s Colors window at Apple online. |
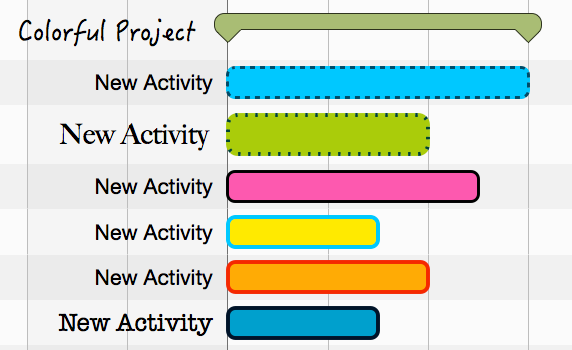
Changing the background color. Following that, Non-working Time will be displayed in the selected color in the Work Breakdown.
Example 2: Custom bar colors
Open a new or existing project in Merlin Project Express.
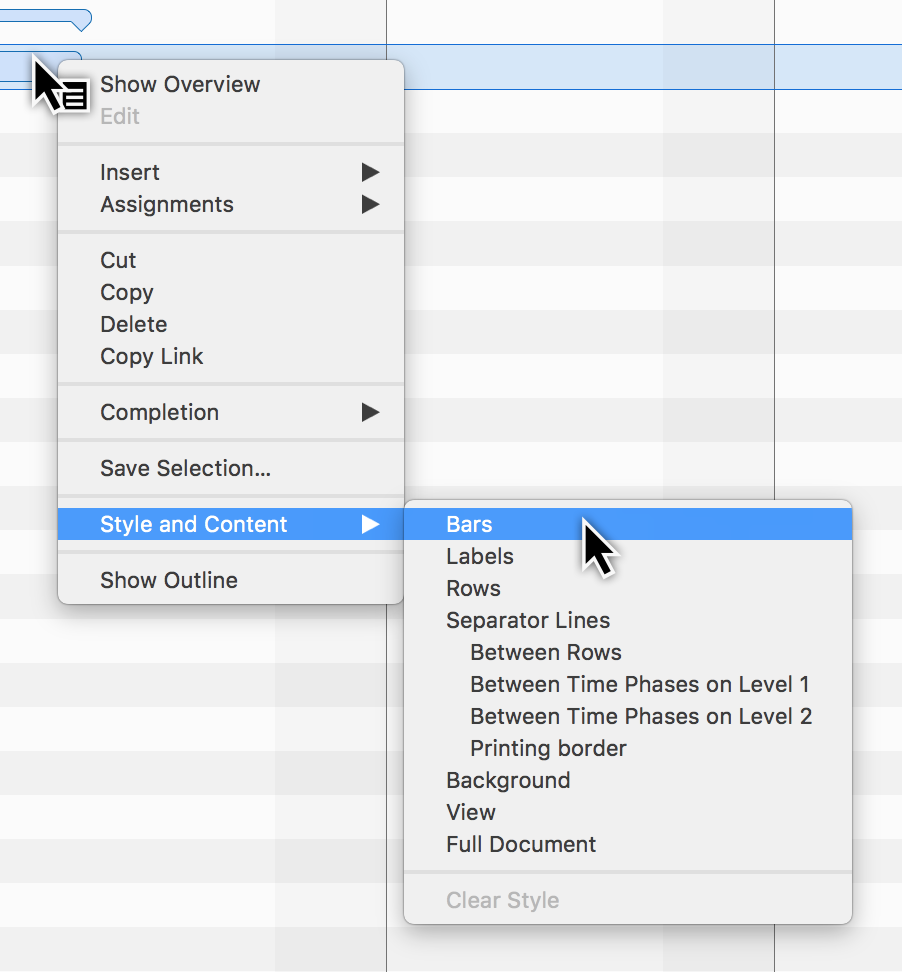
To change the color of a bar, milestone or group, first right-click a bar, group or milestone.
From the context menu, select the option Style and Content > Bars.
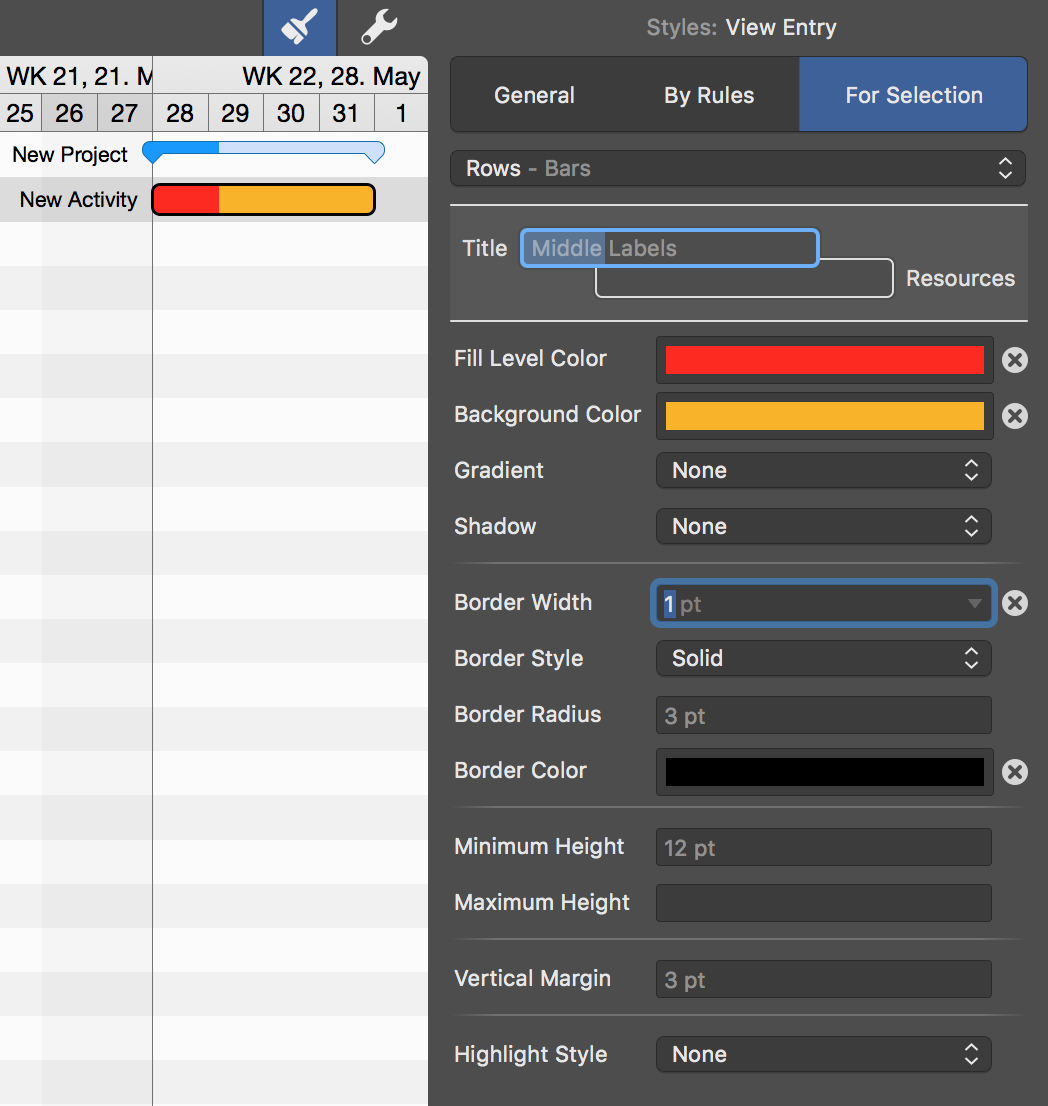
The For Selection tab will open in the Inspector. There you will find options to modify the styles for the selected bars.

Click Background Color. In the Color window, choose the desired color. This will be adopted immediately for the selected bars. Repeat the process for the Fill Level Color.
|
|
The fill level color is displayed only once the activity has progressed in the rows. |
If required, make further changes to options in the Inspector to modify the style of the selected bars.

Click the cross icon if you want to undo the value of an option. In doing so, the value of the parent level or condition for the option will be used instead.
|
|
The above steps also work with multiple selections. You can select several bars using the Caps Lock key or cmd key and use the Inspector. |
When making a multiple selection, if the bars have different values then Multiple Values will appear in the Info field. Click the field and adjust the color so that all selected bars are assigned the new color. This overwrites the old values.
Otherwise, click the cross icon to revert from multiple values to the default values.
Example 3: Activate labels in Gantt bars
Click the brush icon. In the Inspector, select the appropriate tab.
Select the General tab so that the change applies to all content in the view.

Click the desired label in the preview.
There are three labels to choose from:
-
Left Labels (title)
-
Middle Labels (middle labels)
-
Right Labels (resources)
Click the Content drop-down menu and select the desired content for the active label.
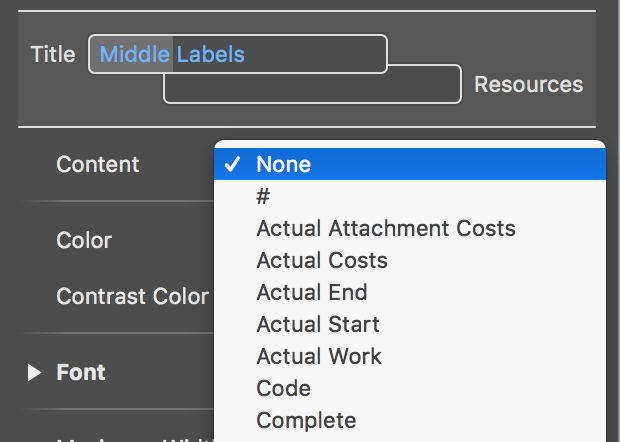
The Content drop-down menu contains all the information that can be used in labels.
Style properties
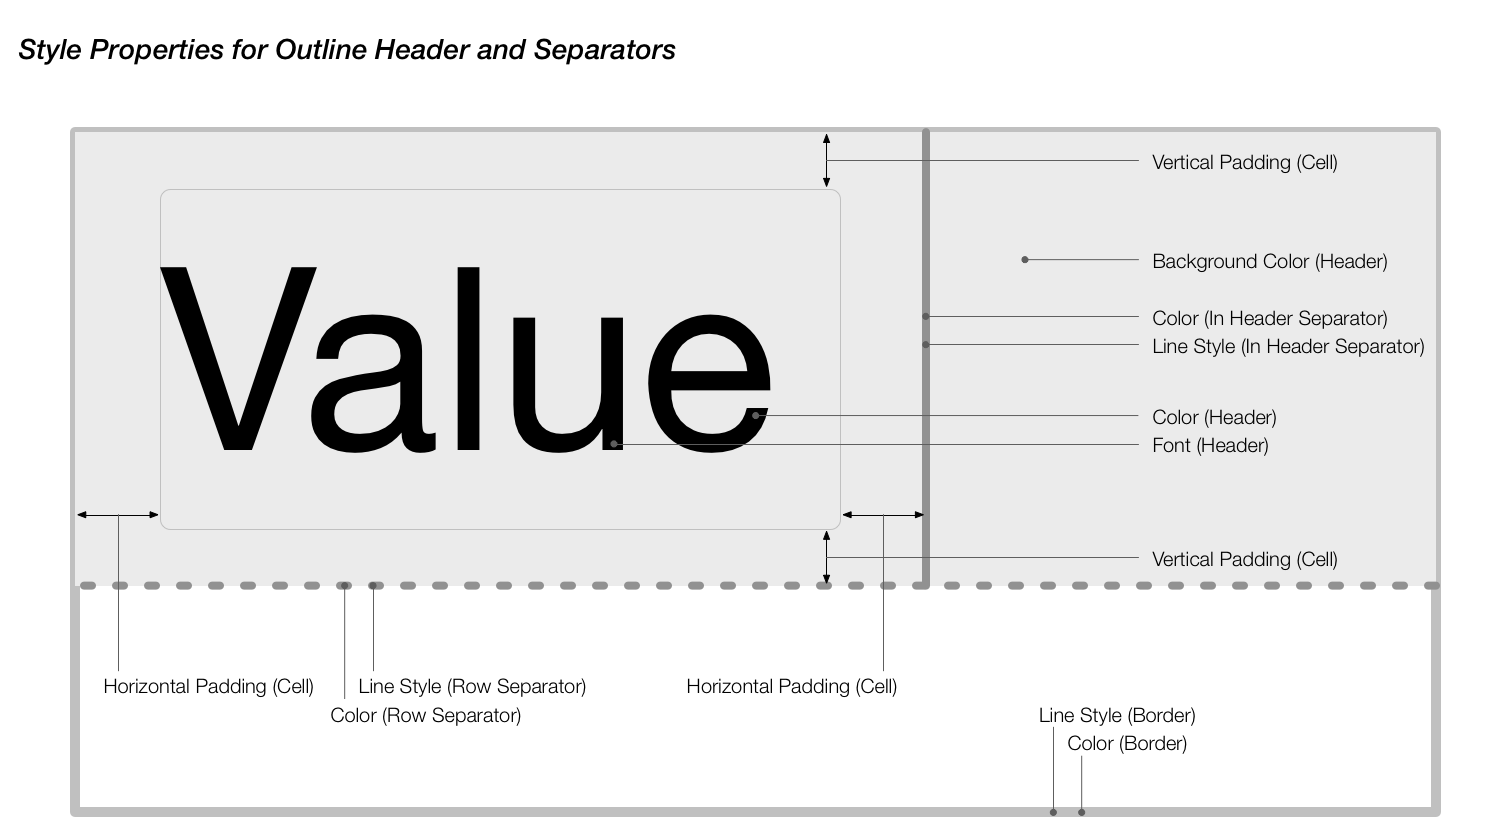
Outline style properties
All elements in the Outline include various options to change styles. These are summarized graphically in the following image.

|
|
Right-click a title in the Outline. From the context menu, click the style options for Rows, Cells, and Separator Lines in the Outline. |
Outline column style properties
Outline columns include various options to change column styles. These are summarized graphically in the following image.
|
|
Right-click a column title above the Outline. From the context menu, click the style options for Rows, Cells, and Separator Lines in the Outline. |
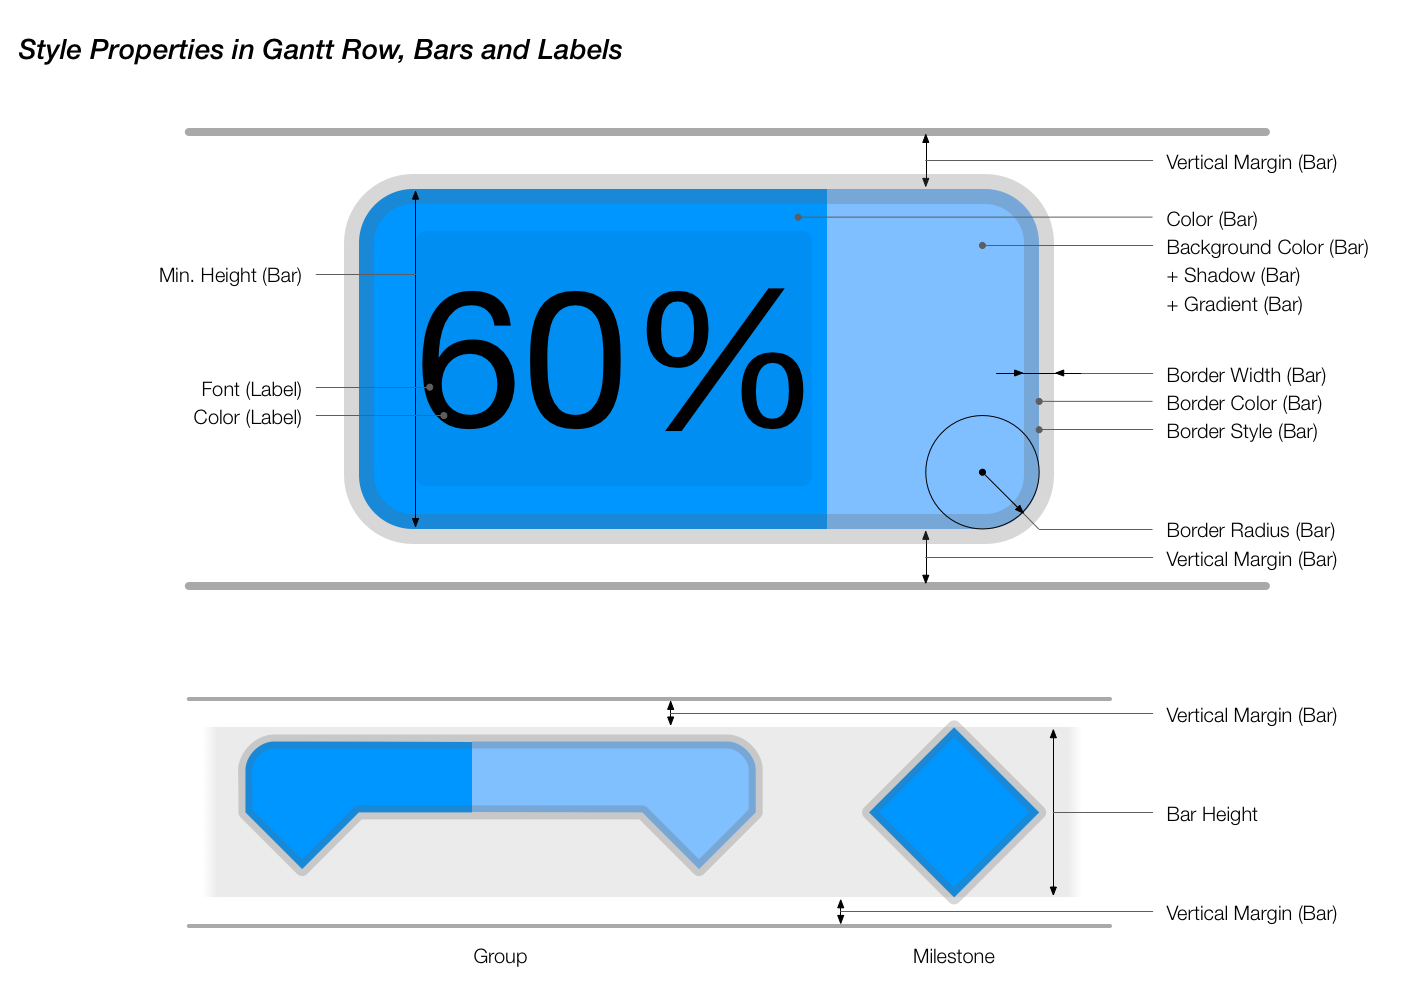
Gantt chart bar style properties
Gantt chart bars include various options to change the bar styles. These are summarized graphically in the following image.
|
|
Right-click a bar, milestone or group. From the context menu click the style options for Bars in the Gantt chart. |
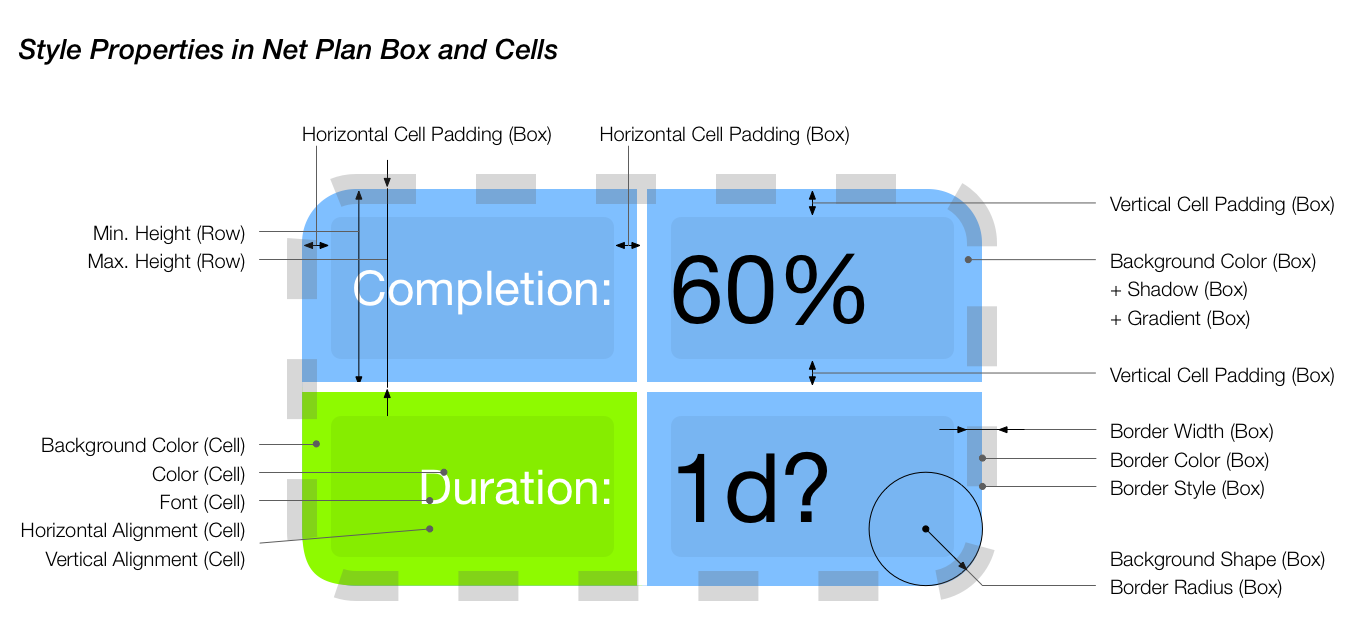
Net Plan box and histogram style properties
Net Plan boxes and histograms include various options to change the bar styles. These are summarized graphically in the following image.
|
|
Right-click a bar, milestone, or group. Select Style and Content > Bars in the context menu. In the Inspector, in the Row Type drop-down menu select either Boxes or Histogram instead of Rows. |

Search and replace
Merlin Project Express offers you a built-in Find function to search for content within projects.
Use the keyboard shortcut cmd + F to open the search box at the top of the active view.

|
|
You will find all the search options together with the relevant keyboard shortcuts under the menu item Edit → Find. |
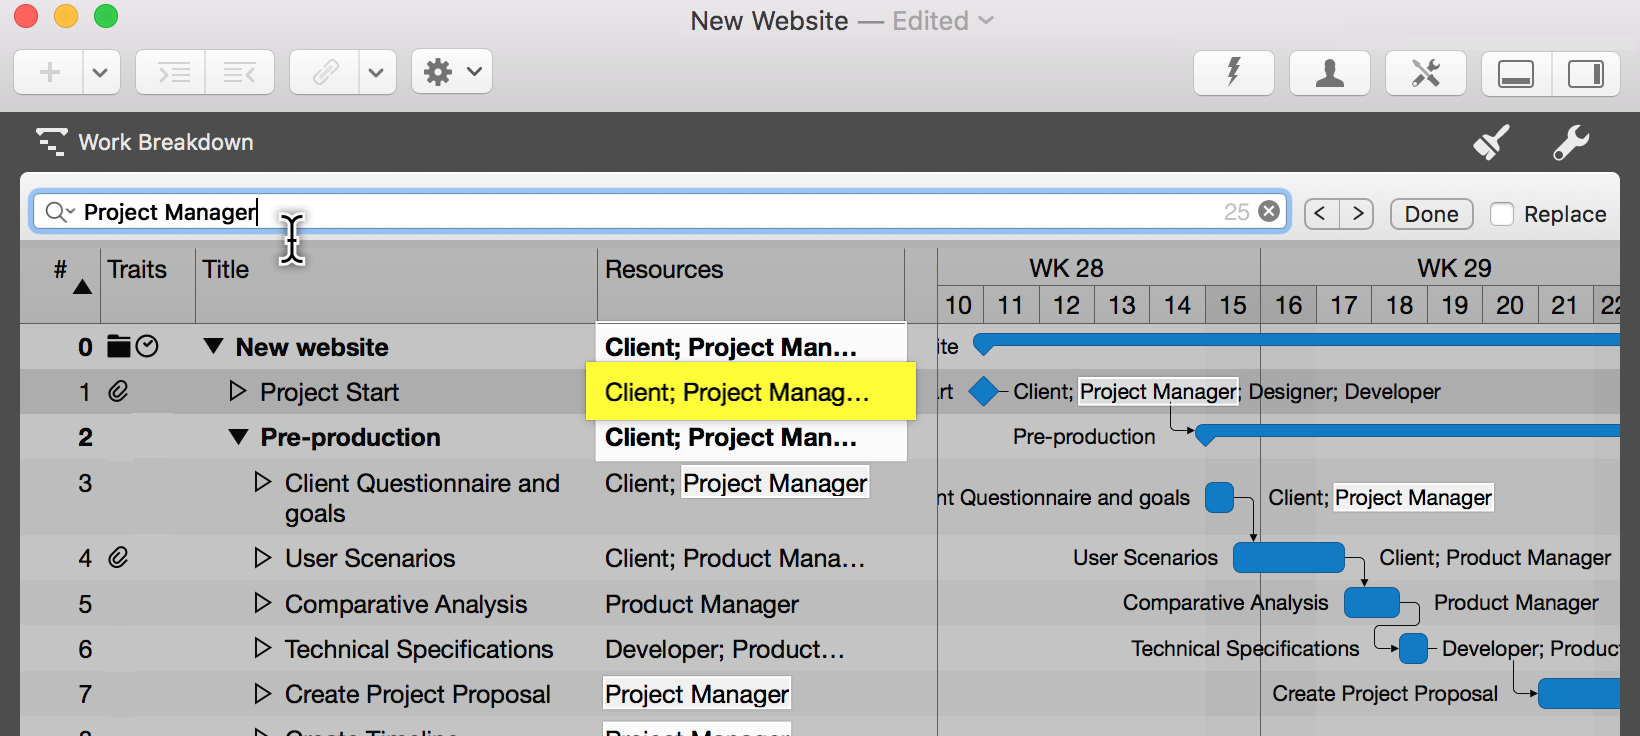
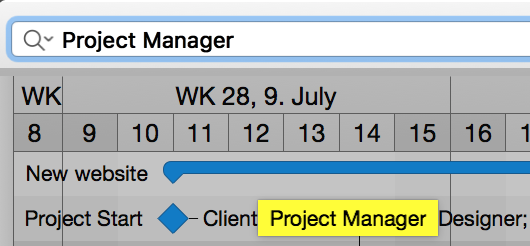
If you enter a term in the search box, all hits will be highlighted automatically in the view, making them easy to spot.
You will find the magnifying glass icon on the left in the search box. Click it and a menu will appear with the options shown.
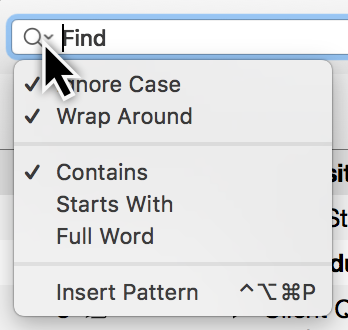
Click Insert Pattern and a further menu will open. There you will find a selection of pre-defined patterns. These patterns make it easier to search.
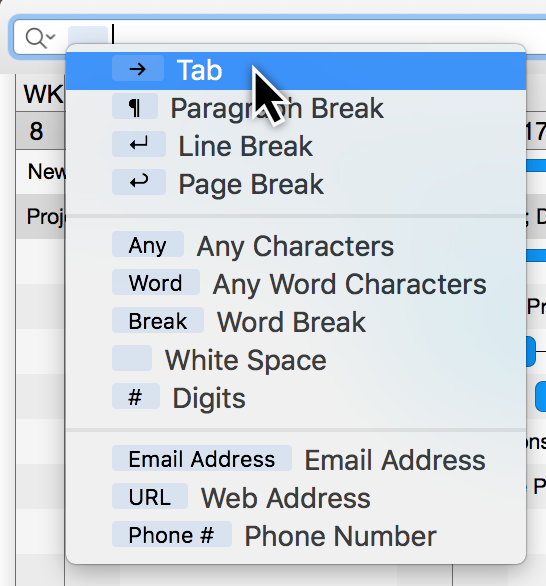
For example, if you select the option Word, individual characters of a word are marked automatically as hits.

If you enter a letter before the word, e.g. an N, all words starting with N will be found in the project.
The right-hand corner of the search box displays the number of search hits and includes an x to delete the current search.
To the right of the search box are buttons for navigating the search results.
If there is more than one search hit, use the arrows to the left and right. This takes you to the next (→) or previous (←) search hit.
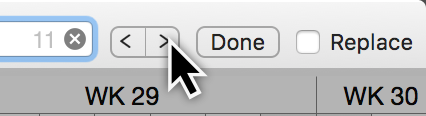
Click the Done button to exit the search and hide the search box again.
If you tick the checkbox next to the option Replace, another box appears. Now you can find and replace terms in the project.
Replace
The Replace function is very easy to use. Enter the word(s) to replace in the upper search box. In the lower box, enter the word you want to replace the hits with.

On the right next to the Replace box you will find three buttons:
-
Replace (_replaces search terms step by step)
-
All (replaces all search terms at once)
-
Done (finishes replacing)
Find menu
In the menu item Edit → Find you will find all the search options described above as well as the following ones.
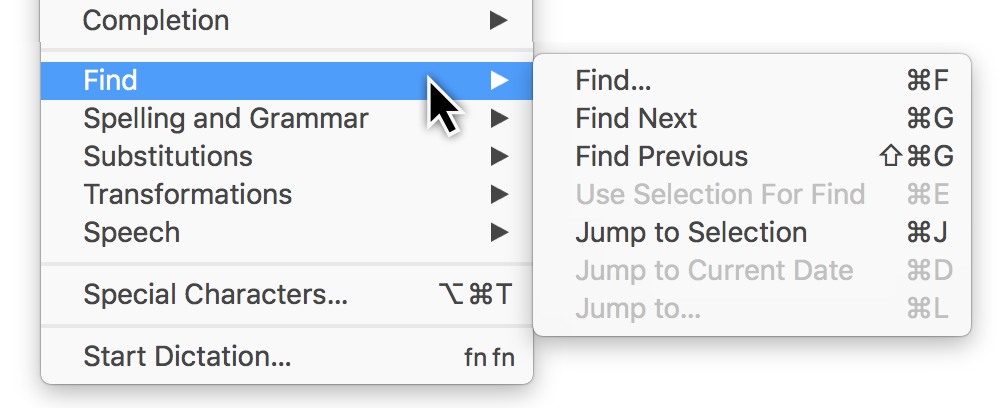
Using a selection for searching
Use Selection For Find lets you additionally search through hits.
Use the keyboard shortcut cmd + E for the option.
Jump to Selection
Jump to Selection lets you jump to a previously made selection, such as a selected activity or several items of selected content in the project.
Use the keyboard shortcut cmd + J for the option.
Jump to Current Date
Jump to Current Date lets you find the current day in the project quickly.
Use the keyboard shortcut cmd + D keys for the option.
Jump to…
Jump to… lets you jump quickly to individual project rows.
|
|
This feature is particularly useful for very large projects. |
Use the keyboard shortcut cmd + L keys for the option.

The Jump to box will appear in the active view. Enter the desired row number into the box.
By clicking the triangle you set your preferred numbering:
-
#
-
Code
-
WBS Code
|
|
If you also use custom Code or WBS Code in addition to the default # numbering, you should display the corresponding columns. |
Project settings
Merlin Project Express provides a number of settings for the open project. Click the Settings icon or use the File → Project Settings menu to open the Inspector.
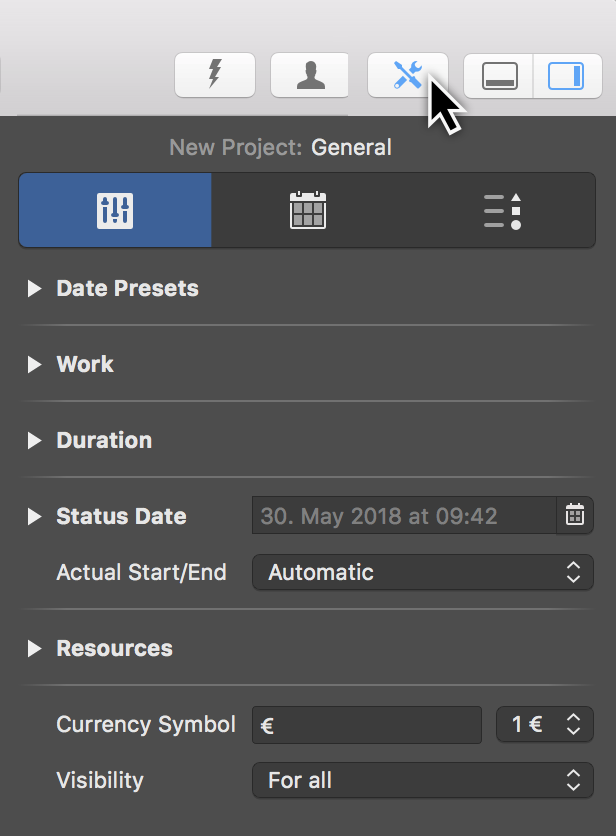
General
The General tab contains the following settings for the project:
-
Date Presets
-
Work
-
Duration
-
Status Date
-
Resources
|
|
The visibility of the project relates to multi-user use and Merlin Server. |
Here you will also find settings for the currency sign used in the project and the visibility of the project.
Date Presets
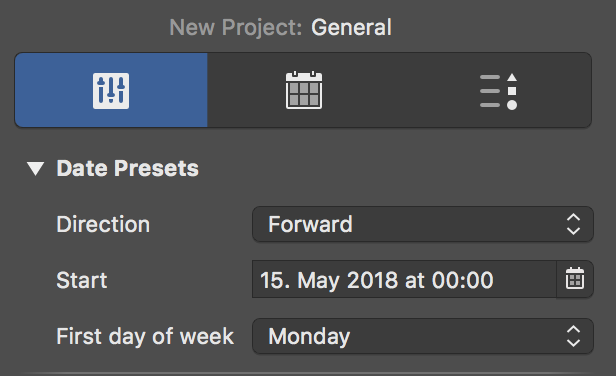
Date Presets relate to the project and are therefore important.
Direction
The direction sets whether the project is forward planned or backward planned.
The Forward option is active by default and lets you begin a project from the start date.
The Backward option allows you to work backwards in the project starting from an end date.
Start
The Start is the start date for the project and is required.
|
|
Whenever you create a new project, tomorrow’s date is always set automatically as the start. |
First day of week
The First day of the week option specifies the day on which the week begins. This varies from country to country. By default, in Europe a week starts on Monday.
Work

This is where you will find the project work settings.
The following values can be set:
-
Hours per working day
-
Hours per working week
-
Days per working month
Default Value
The Default Value is used for newly created activities. Each new activity is assigned the Default Value for Work automatically.
The ? is only an indication that the Default Value is estimated. Delete the ? if not required.
Duration

This is where you will find settings for the project duration.
As with work, a Default Value for Duration can optionally be set. This means that new activities are assigned the Default Value automatically for the duration.
Calculation unit
The calculation unit determines the unit for calculated fields. Per default it is set to Dynamically. This means that the units are calculated dynamically according to the Work project settings: 8 work hours become 1 work day, 40 work hours become 1 work week, 20 work days become 1 work month.
Units are available in the drop-down menu. Once you set a unit, it is used for calculations throughout the project.
Status Date
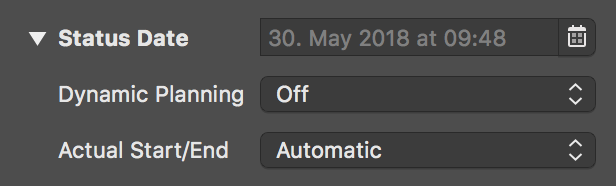
The current progress in the project is compared against this date. The status date updates automatically by default and shows the macOS date and time.
If a status date is set, the progress of the project can be viewed relative to this specific date. This can be handy if you need to create a status report retrospectively, for example at the end of the month.
If you have set the status date and want it to update automatically by default, click the icon next to the date and then the Auto button.

Dynamic Planning
Dynamic Planning is disabled by default.
When activated, Dynamic Planning shifts the content of the project based on the Status Date.
Two variants for Dynamic Planning are available in the drop-down menu:
-
Expected & planned values
-
Only expected values
If you select the first option, dynamic planning is applied to both the expected and planned values in the project.
|
|
If you activate the columns Expected Start and Planned Start, the consequences of dynamic planning are easier to see. |

If dynamic planning is activated, further settings appear.
The granularity determines how detailed dynamic planning should be in relation to the status date. The time units are available in the drop-down menu.
For example, if week is selected as granularity, a different date appears calculated based on the status date and granularity. It serves as the basis for dynamic planning.
Actual Start/End
The Actual Start/End option is calculated automatically by default.
Two further options are available in the drop-down menu:
-
From expected values for change in completion
-
From status date when changing completion
These options take effect when changing the completion of activities and influence the actual start/end of the activities.
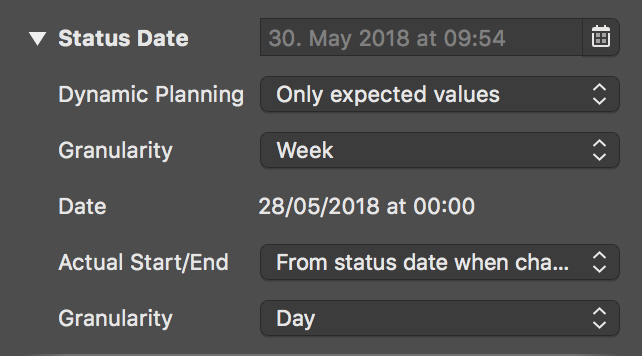
The setting for granularity is also displayed with the From status date when changing completion option.

To deactivate the status date, click the calendar icon and the Today button. If you want the status date to move automatically, click Auto.
Resources

This is where you set the Initials Style for project resources. The Initials are under the Style options. The Format must then be set to Initials.
Share their Work
The Share their Work option is important when there are multiple simultaneous assignments. For example, if two resources are moved to one activity, both share the work equally.
Remove the checkmark to stop the automatic assignment of labor to assigned resources.
Calendars
In the Calendars section you can manage the various calendars in your project. Here you can edit, create new, rename, delete calendars and define which calendar should be the default Project Calendar.

New Merlin Project Express documents come with following pre-defined calendars:
-
Standard - 5 days by 8 hours spread out over the day time (8am-12pm and 1pm-5pm).
-
Night Shift - 5 days by 8 hours, but spread out over the night hours (11pm-3am and 4am-8am).
-
24 hour - 7 days by 24 hours
|
|
The Project Calendar with the enabled tick, is the calendar which Merlin Project Express will use when scheduling new activities. Resource calendars applying for new resources are automatically based on the Project Calendar. |
New Calendars can be created by clicking the + icon.
To remove existing calendars, select the calendar you want to delete and click the - icon.
Regular Week
In the Regular Week section you can manage the regular work intervals per week day. Just select the Calendar you want to manage, select the various week days and edit its regular Work intervals as desired.
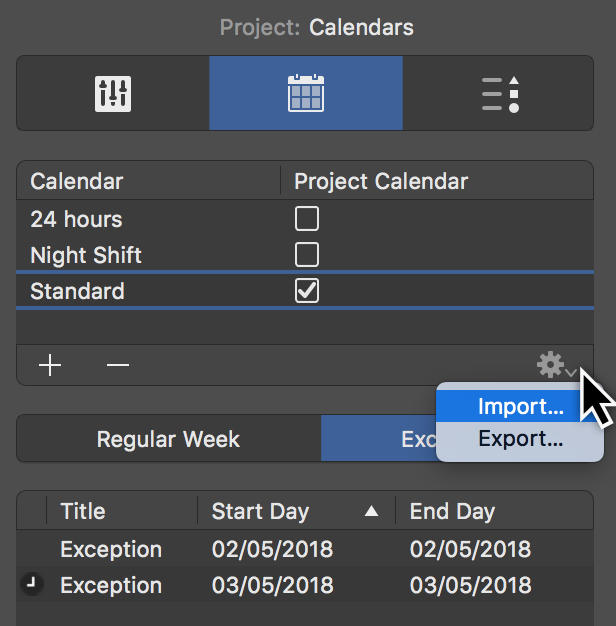
Exceptions
By clicking Exceptions (1) you can set single days or time phases as exceptions for free time and extra working time in the active calendar.

New exceptions are created by clicking the plus (2) icon. Each exception can be customized with the following information:
-
Title
-
Start Day
-
End Day
By default, new exceptions are defined as non-working hours.
These times are only active as additional working times (outside regular working time) when times are added in the Work intervals bar (3).
|
|
Exceptions with Work intervals show a clock icon in the list. |
Import / Export Calendars
Use Export option, to export a configured calendar from a project to be able to import in another Merlin Project Express document. The exported file will include the Calendar’s name, Regular Week and Exceptions.
Use Import option, to import a Merlin Project Express calendar you’ve previously exported, or to insert Exceptions in your existing project out of an ics calendar file.
|
|
Importing an ics calendar file, imports all day events as Exceptions into the project. |
Working times for resources
You can configure the Regular Week and Exceptions of the working times for your Resources in the same way as for the project Calendars.
Just select a Resource row in the Resources view, and click the Calendar tab in the Inspector.
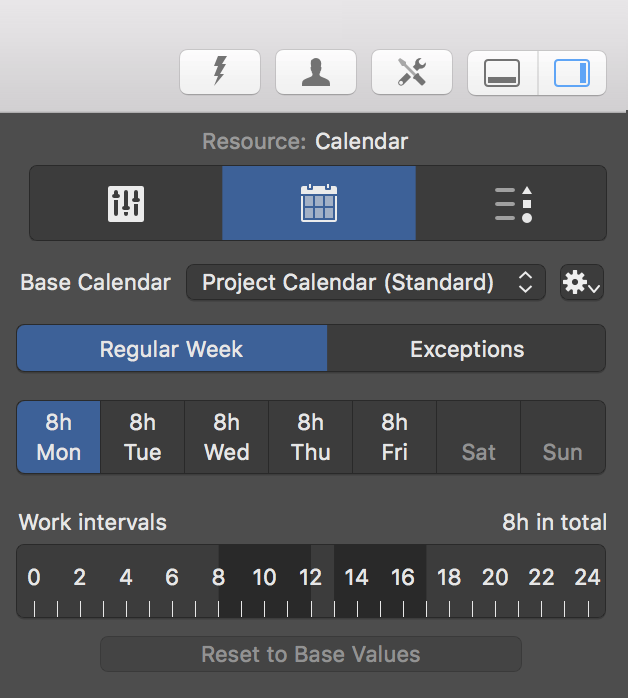
Resource calendars are per default based on the project calendar.
Use the Base Calendar drop-down menu to select another project calendar for the active resource if needed.
If you make changes to the resource calendar, these settings will take priority over the selected Base Calendar.
You can Reset to Base Values and remove changes from the resource calendar for the individual days.
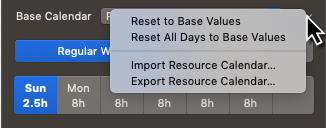
The Calendar tab in the Resource Inspector offers some more options:
-
Reset to Base Values - resets changes for individual days
-
Reset All Days to Base Values - resets all changes for all days
-
Import Resource Calendar… - imports Merlin Project Express calendars or ics calendar files as Exceptions.
-
Export Resource Calendar… - exports Merlin Project Express calendars
Value Lists
Here you can edit entries of Value Lists used in attachments or for cost.

Lists are available for:
-
Cost (Type, Status)
-
File (Status)
To insert new items in a Value List:
-
Select the relevant list from the For drop-down menu
-
Click the section of the list where you would like to insert a new entry
-
Click the + symbol to create a new entry.
-
Edit the entry as desired.
|
|
You may drag the new entry upwards or downwards to change its order. |
Change the name of existing entries by double-clicking the title of the entry.
Click the - symbol, to delete values from the list.
Some value lists allow you to set an attention symbol. Simply select the desired symbols as needed.

Save
File > Save…
The first time you save a document, you name it and choose where to save it—on your desktop or in a folder, for example.
Thereafter, Merlin Project Express automatically saves your document as you work.
-
Click anywhere in the document window to make it active
-
Choose 'File > Save'
-
Enter a name in the Save As field
-
Choose where to save the document
-
Click 'Save'
File > Duplicate…
You can duplicate an opened document. The copy is saved to the same location as the original.
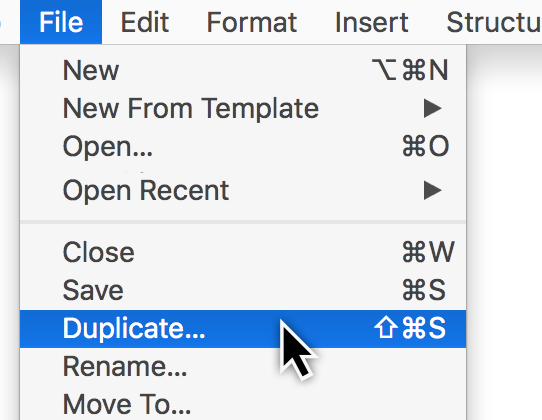
In Merlin Project Express you have two additional options:
Keep document history
Choose this option to create a duplicate with the same document history and be able to undo all your previous actions starting by document creation.
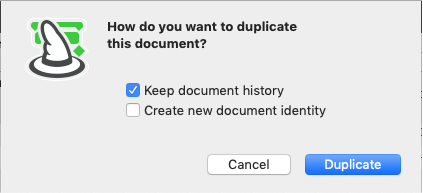
Create new document identity
Choose this option to remove document history in the duplicate and work in this document by a new identity. This would allow you to combine for example the old file with the new duplicate within master projects.

You can print from Merlin Project Express via the File → Print menu item. This uses the standard print dialog integrated into macOS. The Page Setup settings can be found there.
Print project content
The macOS print window has two views: One with fewer details and one with more details.
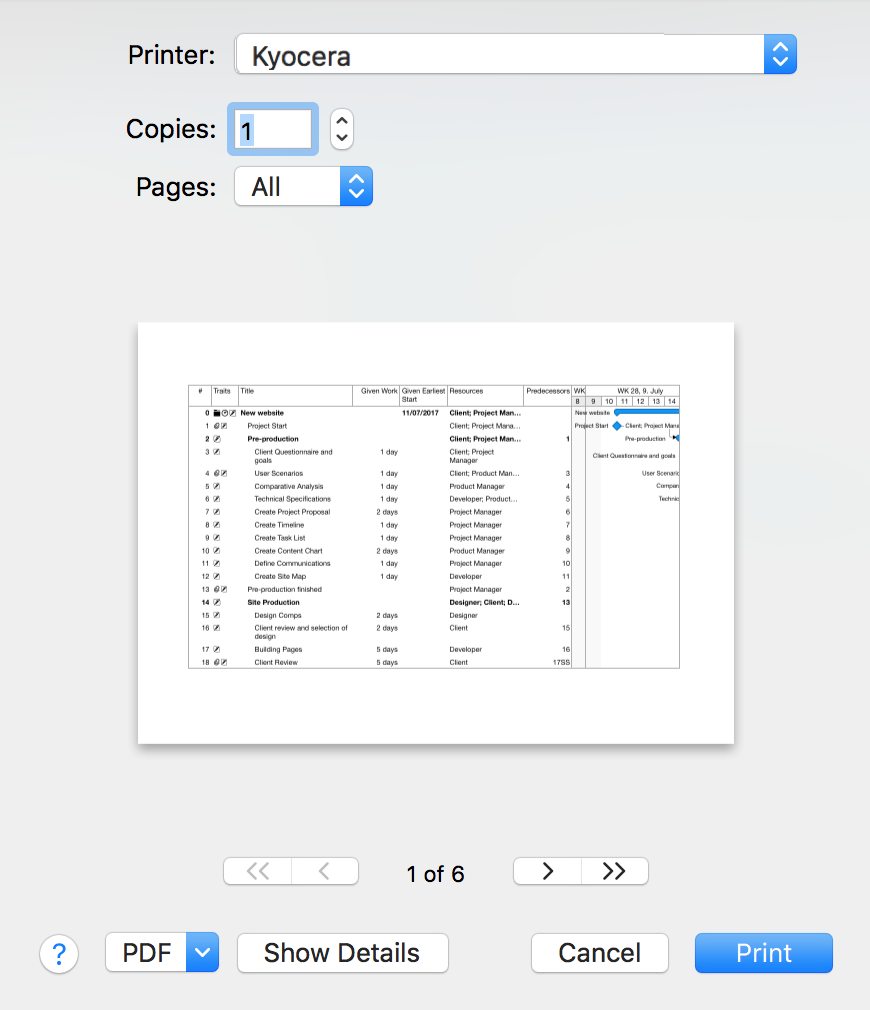
This basic view only offers a few options. Click the Show Details button. This opens the advanced print view. Here you will find the options described in the following.
|
|
The page setup and orientation settings depend on the printer used. |
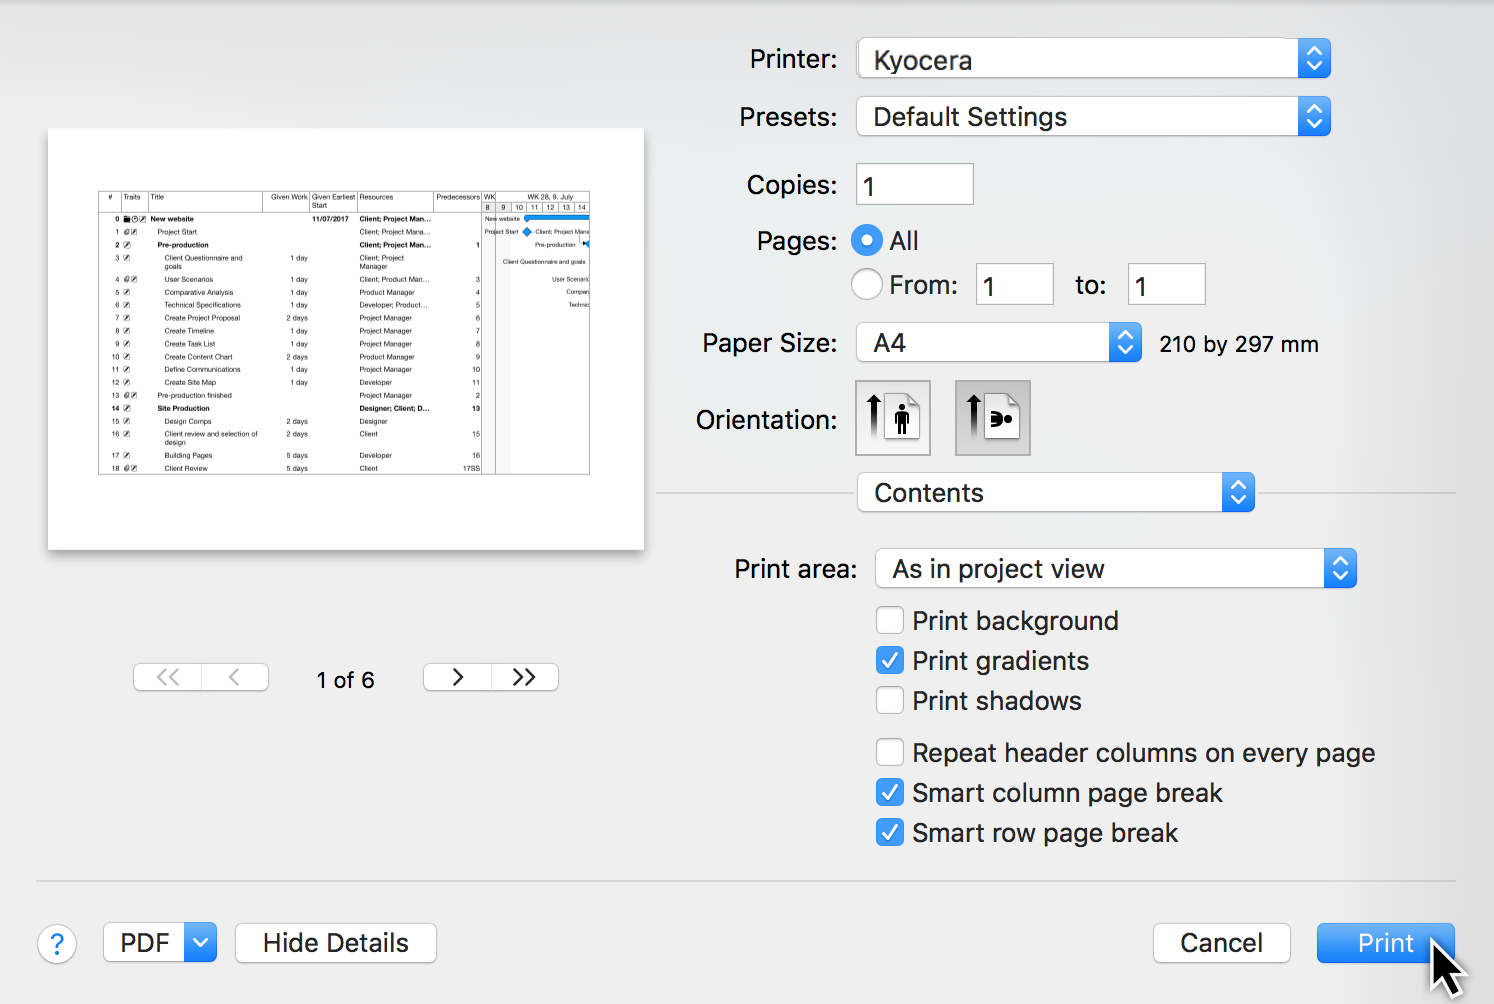
Content
The Content drop-down menu offers options for configuring the content to be printed.
For example, you can configure the print area:
-
As in project view
-
Outline and Gantt chart
-
Outline only
-
Gantt chart only

The other options control how the project is printed graphically:
-
Print background
-
Print gradients
-
Print shadow
-
Repeat header columns on every page (useful for printing over several pages)
-
Smart column page break (useful for printing over several pages)
-
Smart row page break (useful for a printout over several pages)
Scaling
Under Scaling you set the scaling of the project to the configured paper format. If you want to output a large project on A4 paper, it may come out looking very small.
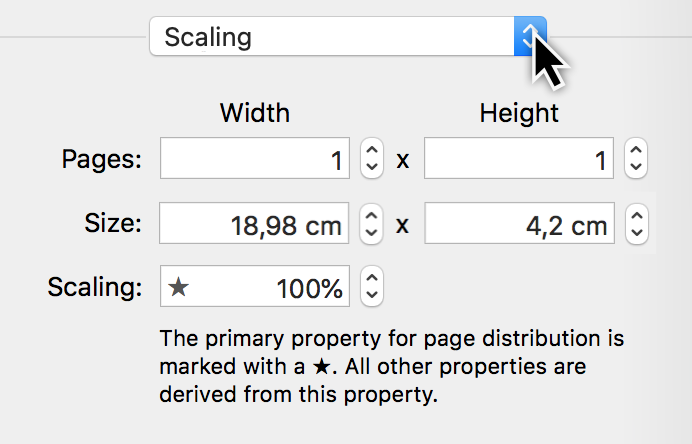
The number of pages, based on the width or height of the selected paper format, determines the size of the output.
|
|
If you set the width to one page, the project will be scaled to fit the width of the sheet. See the following section. |
Printing the project on a single sheet
Click the paper orientation option to select whether you want your project content printed in portrait or landscape format.
Then select Scaling from the drop-down menu. If, for instance, you have selected landscape, set the width to one page.
This resizes the entire project to fit the full width of one sheet.
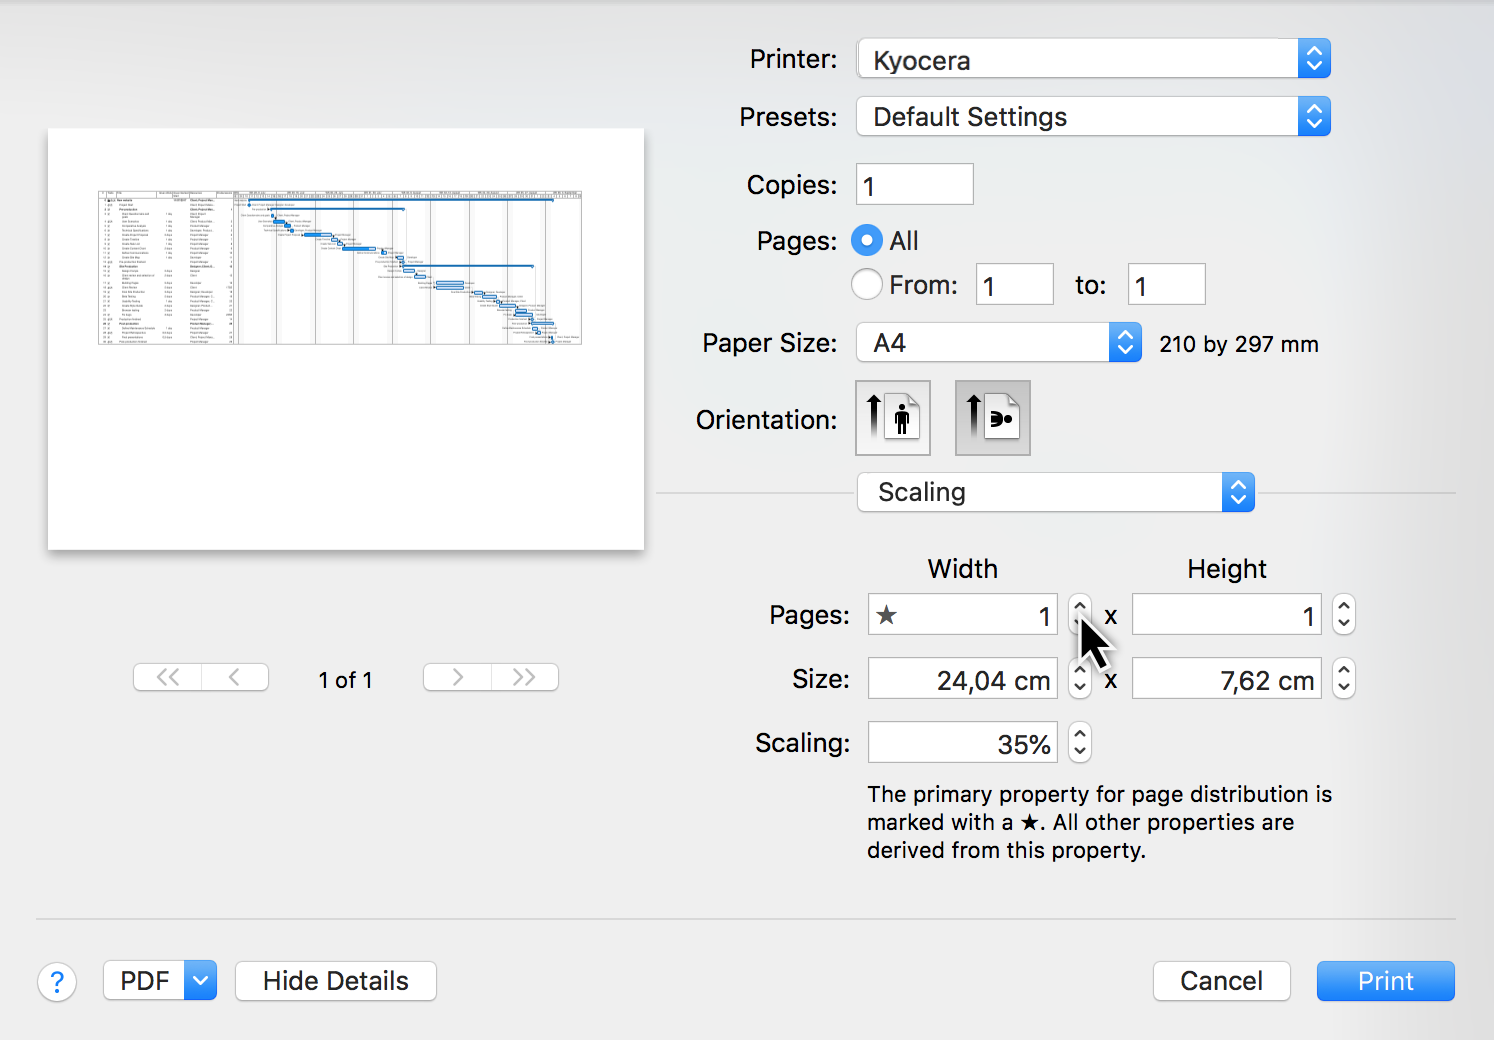
|
|
This setting is marked with a star. All other values are derived from this setting. |
Header and Footer
The options for the header and footer offer a variety of settings. You will find pre-defined entries arranged at the bottom. The Format drop-down menu contains text formatting options.

Select the information you want to appear in the header and footer, and select the alignment in the row (left, center, or right). Following that, you can drag & drop the entries in the field to move them around. You can also enter your own text to expand on the entries.
Borders
The Borders option can be used for headers and footers as well as a watermark.
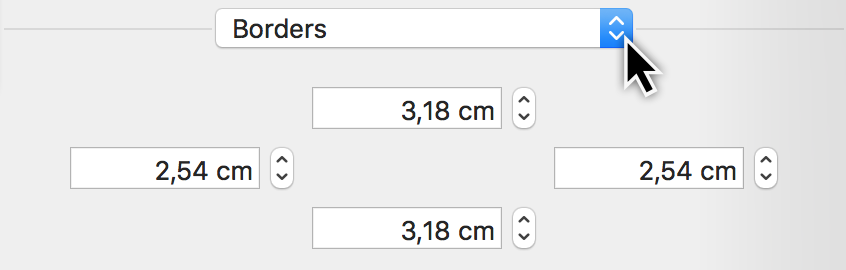
Enlarge the borders if the header and footer as well as the watermark are covered when printing out project content.
|
|
The distance from the paper margin varies depending on the printer model. |
Watermark
The Watermark option lets you include a graphic in the printout. This allows you to include custom company logos in the printout.
The various options control the position, size, and opacity of the image in the printout.
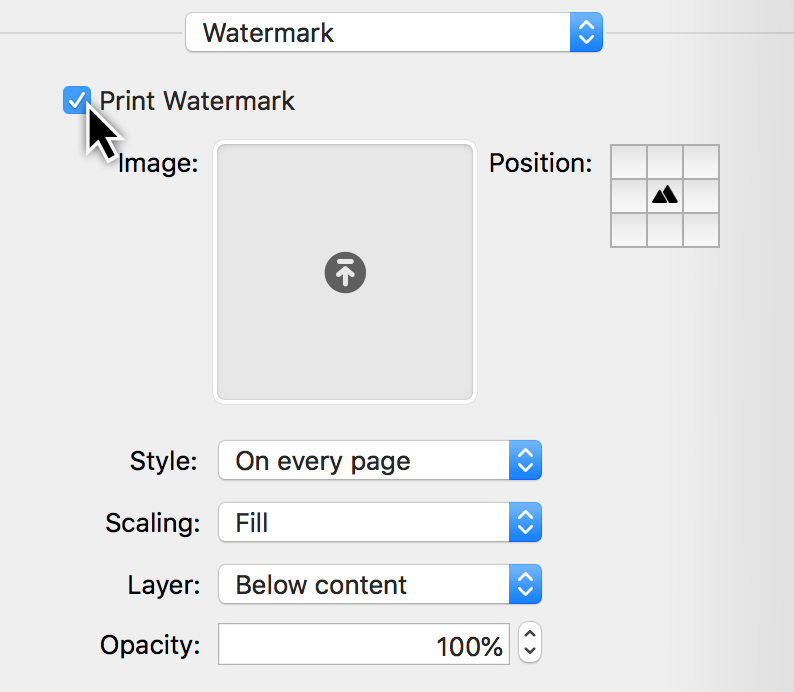
First tick the checkbox next to print watermark.
Then move a graphic file, which you want to use as a logo for the watermark, into the image field.
Next, set the position, style, scaling, layer, and opacity of the watermark.
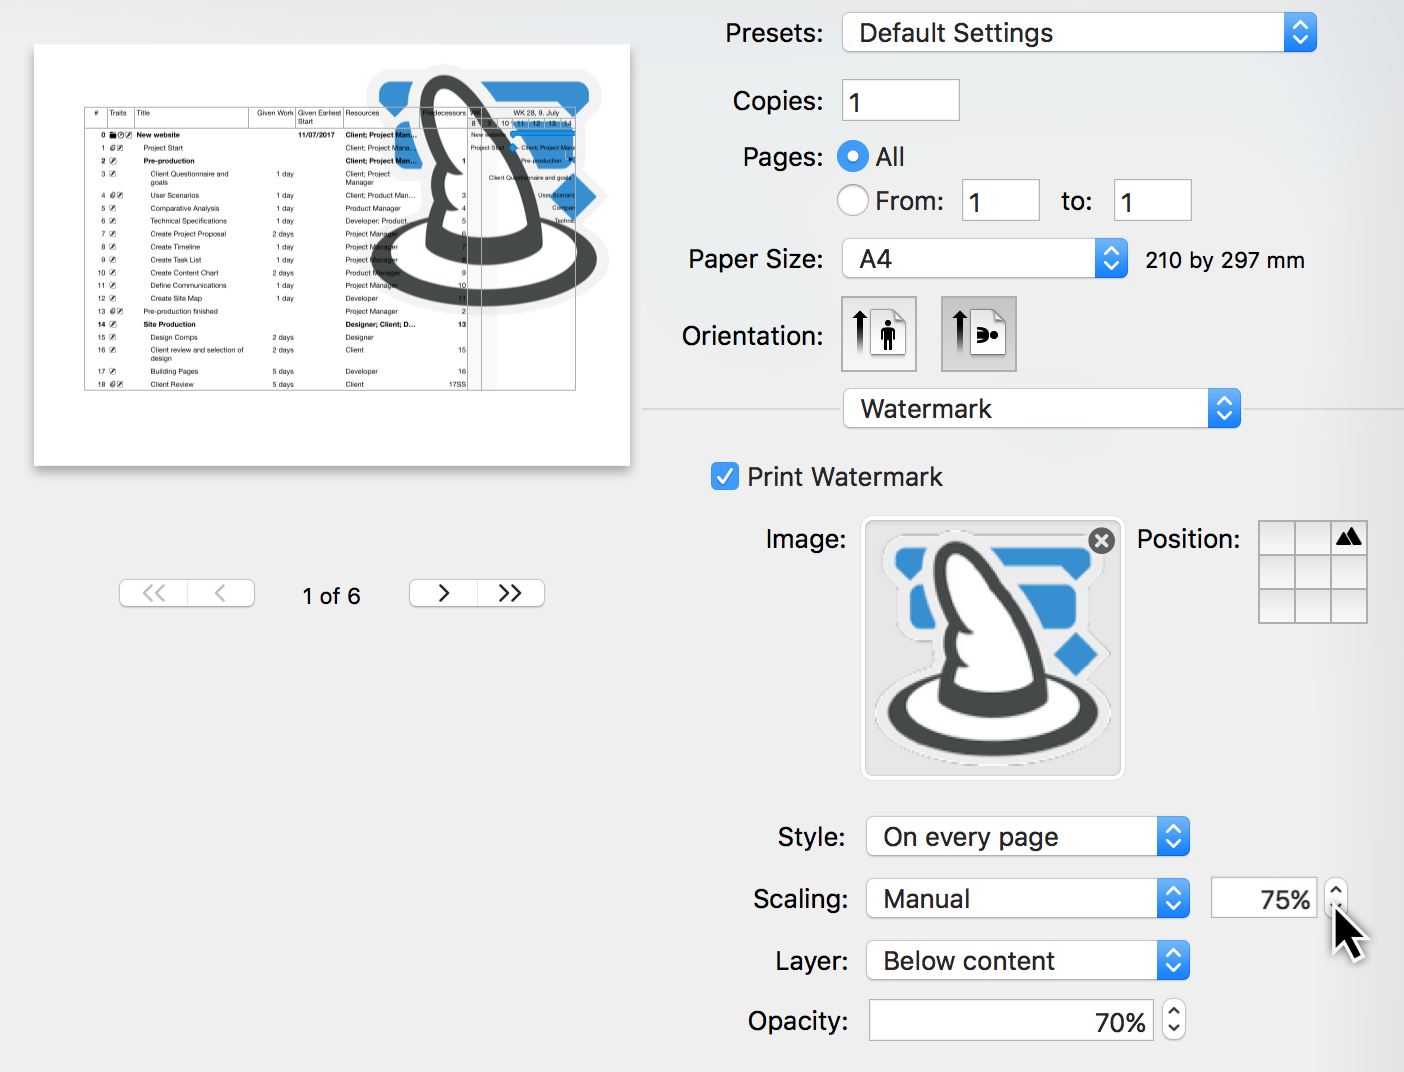
Set the scaling to manual, so that the size of the image can be changed in percentage terms.
In the mini preview you can see the result of the changes in real time.
|
|
Any graphic format supported by macOS and Preview can be used for the watermark (JPEG, GIF, TIFF, PNG and others). |
Printing PDFs
You can create PDF files quickly and easily via the print window.
Click the Show Details button. This opens the advanced print view. Configure the print options as necessary. Following that, click the PDF button on the bottom left.
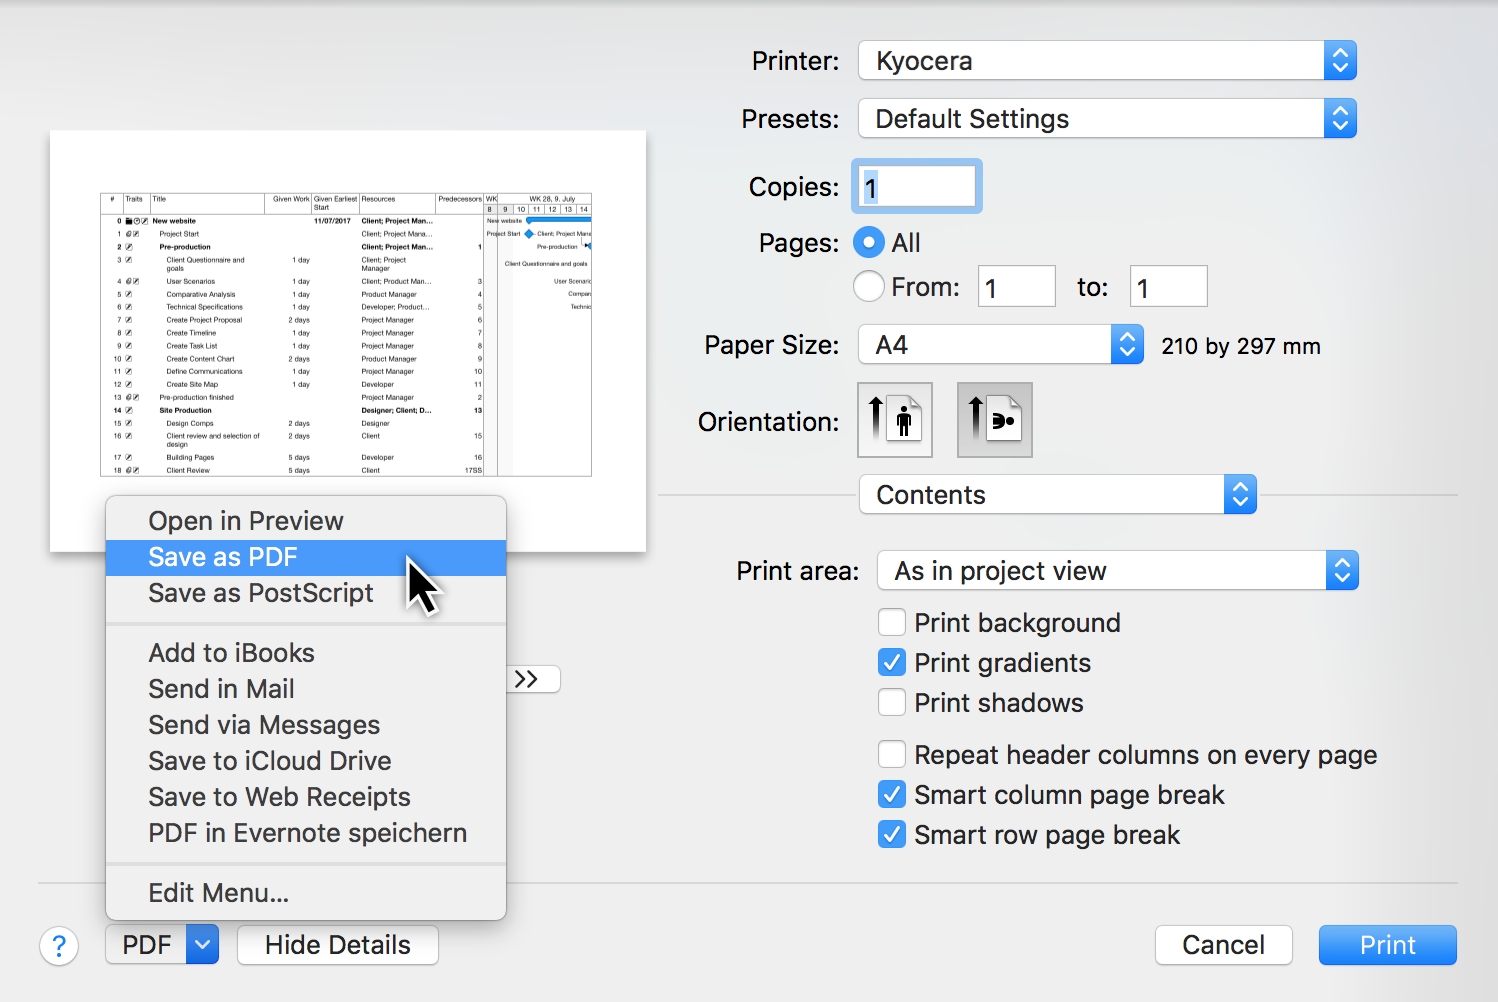
Click Save as PDF. The macOS Save dialog will open. Name the PDF file.

In addition, further options for creating the PDF file can be found here:
-
Tags (tags used in macOS Finder)
-
Title (document title)
-
Author (author and copyright holder of the document)
-
Subject
-
Keywords
|
|
These are optional settings that can be used if required. |
PDF security options
The Security Options… button gives you the option to password protect the PDF file and its contents.

Export
Merlin Project Express can export in various file formats:
-
Text (recommended for exchange with EXCEL sheets)
-
Calendar (ics files)
-
Image (PDF, PNG, JPG, JPEG 2000, TIFF, BMP, GIF, all with watermarks and other settings)
-
OPML
-
Merlin Project XML
To export, just select the menu item File → Export and the desired Format.
To export a single-sided PDF, select the menu item File → Export and click the Image format.
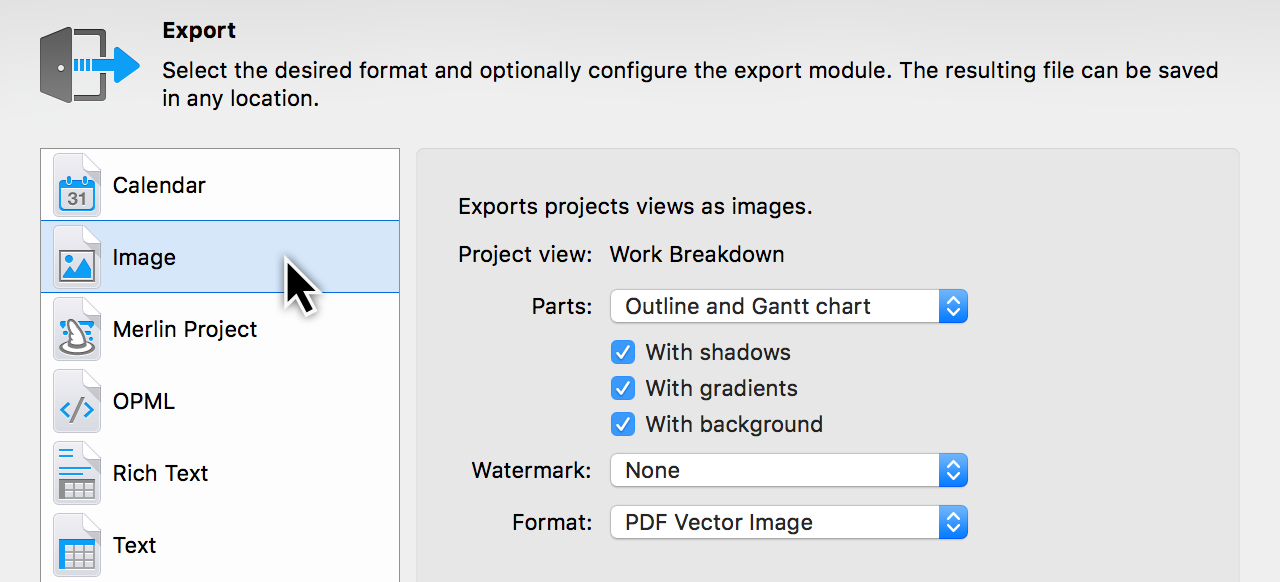
On the right-hand side you will see the settings for exporting the image.
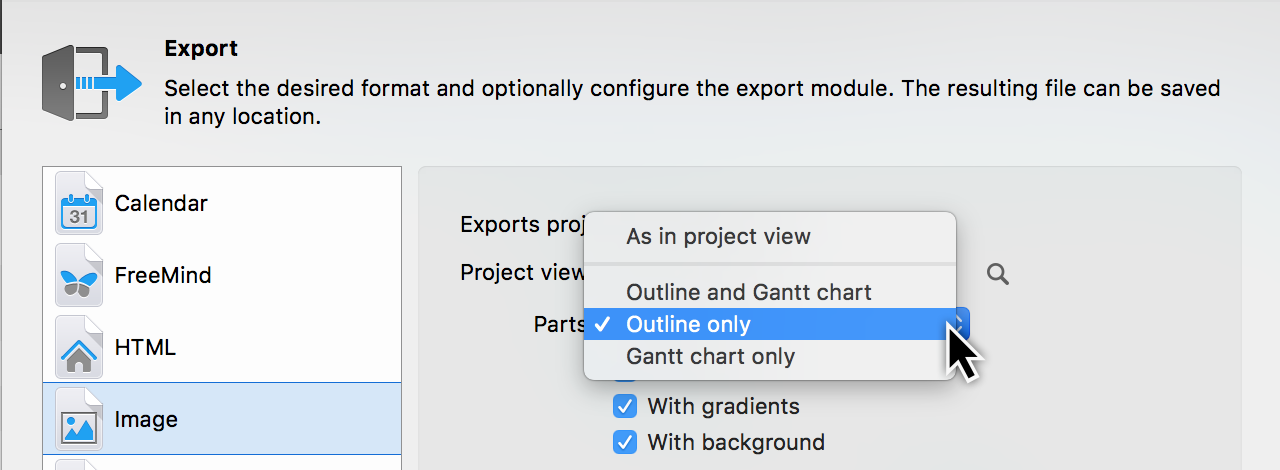
-
Parts (outline and Gantt chart or only one of the two ranges)
-
Watermark
-
Format (image format in our case PDF vector graphic )
Specify which parts you want to export as a single-sided PDF.
Further settings for modifying the PDF output can be found here.
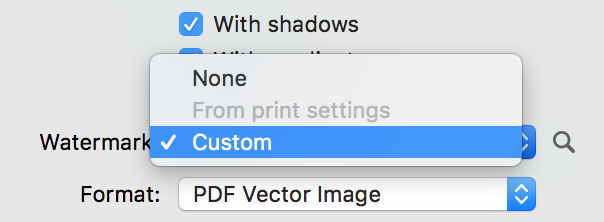
For instance, select the Watermark option to add a custom image to the PDF.
|
|
If a watermark is already used in the print settings of the project, it can be used directly. |
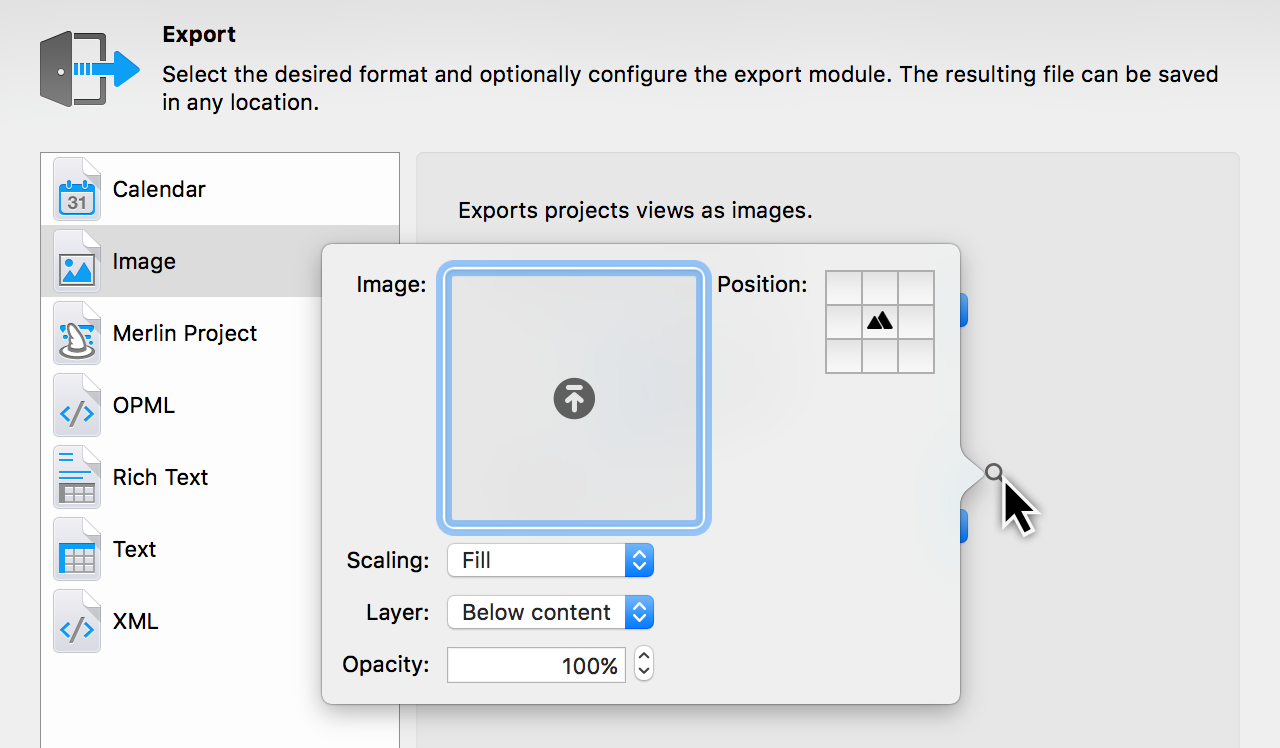
Click the magnifying glass and the settings for the watermark will appear.
Then click Next. In the dialog box, enter a filename for the PDF and select the desired storage location. Finally, click Export.

|
|
A single-sided PDF is suitable for forwarding the project to users with a large format printer. |
Finance
Merlin Project Express offers you finance options for your project. Every activity, milestone, activity group or assignment can be assigned a budget and base costs.
The easiest way to do this is to use the Finance tab in the Inspector.

There you will find three more tabs:
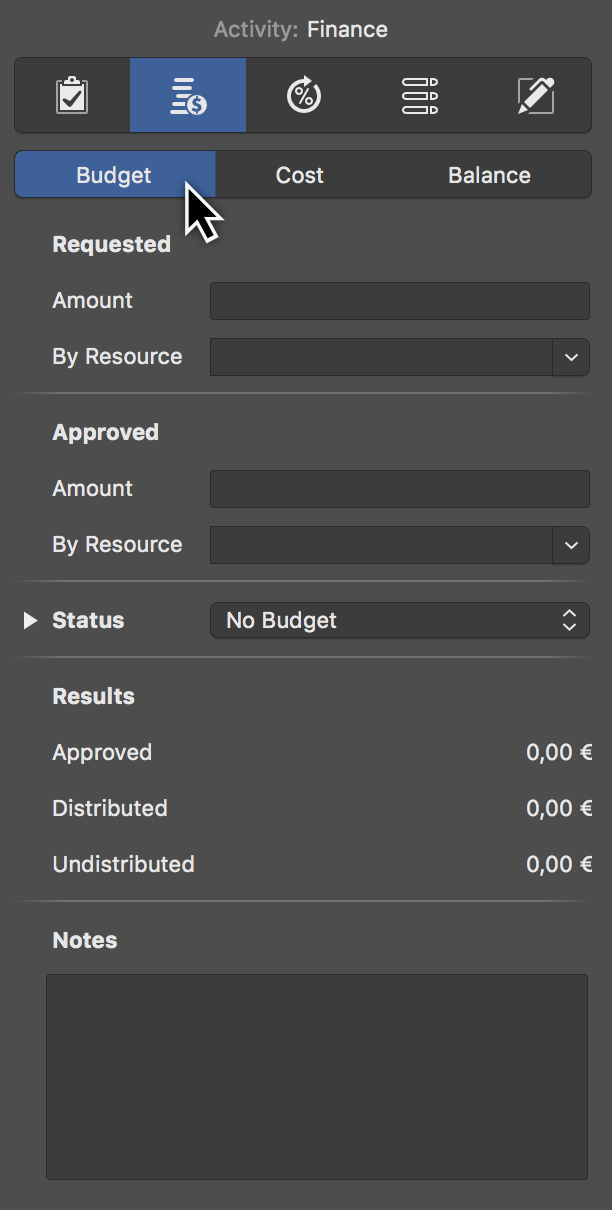
Budget
Budget means money that is available for the project.
Select an activity, milestone, or assignment and then click the Finance → Budget tab in the inspector. Here you can enter all budget information in the fields provided.
|
|
If you do not have a budget and would like to record base costs in your project, use the tab Finance → Cost. |
Cost
In the tab Finance > Cost you can enter base costs for the selection.
|
|
Base Costs are fixed costs that arise during planning and execution of the project and add up to existing work costs or attachment cost. |
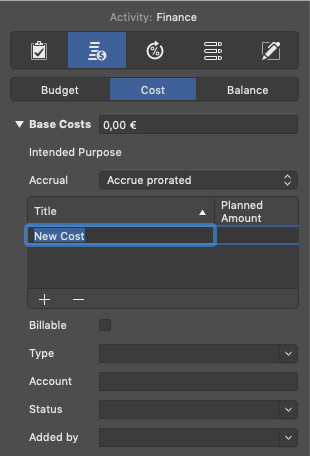
If you have several cost items, first click the triangle next to Base Costs and create new entries one after the other by clicking the + icon. Merlin Project Express will then add up the individual cost items automatically. The Base Costs field lists the total of all cost items.
You can select one of the possible accruals:
Accrue immediately
Basic costs with Accrue immediately appear immediately and in total in the Actual Base Costs.
Accrue at start
Basic costs with Accrue at start appear in total in the Actual Base Costs but only from the moment on when there is actual progress.
Accrue prorated
Base costs with Accrue prorated appear pro rata to the actual progress in the Actual Base Costs.
Accrue at end
Base costs with Accrue at end appear in total in the Actual Base Costs but only from the moment there is a 100% completion.
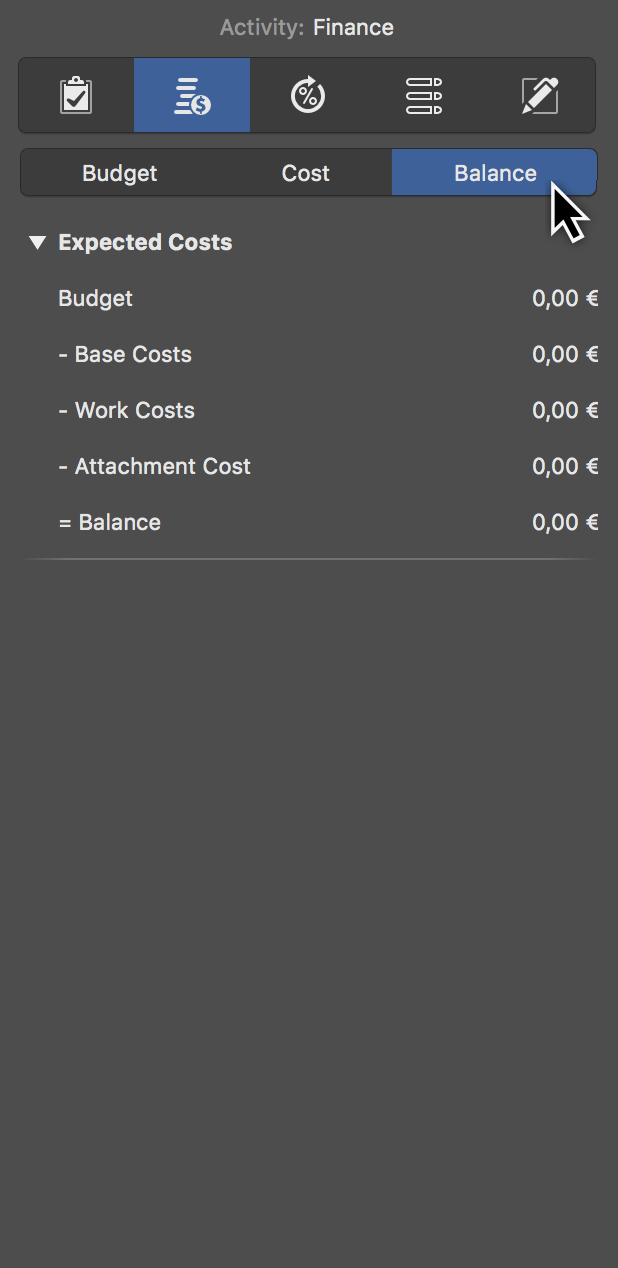
Balance
Under the Finance → Balance tab you will find an overview of expected costs listed by Base Costs, Work Costs, and Attachment Costs.
|
|
Select the project in row #0 and go to Finance → Balance in the Inspector. You will see the total Expected Costs of your project. |
Work costs
Work costs are costs generated by work from resources allocated to the activity.
A resource can have following cost information:
-
Standard Rate
-
Overtime Rate
-
Base Costs
|
|
Enter cost information for your resources in a Resources or Assignments view in the Cost inspector. |
Attachment cost
Attachment cost are costs due to base costs on attachments.
|
|
Enter the basic costs of your attachments in an Attachments view in the Cost inspector. |
Mouse and keyboard
Both the mouse and keyboard are useful when using Merlin Project Express.
Many commands can be accessed directly and quickly with keyboard shortcuts; other tasks are accomplished easily using the mouse.
|
|
The keyboard shortcuts are displayed next to the commands in the menus. |
Mouse
The mouse is a device used to control the mouse pointer. For laptops, this can be the trackpad.
|
|
The latest Macs support a wide variety of input devices (mouse, trackpad, pen tablet, etc.). |
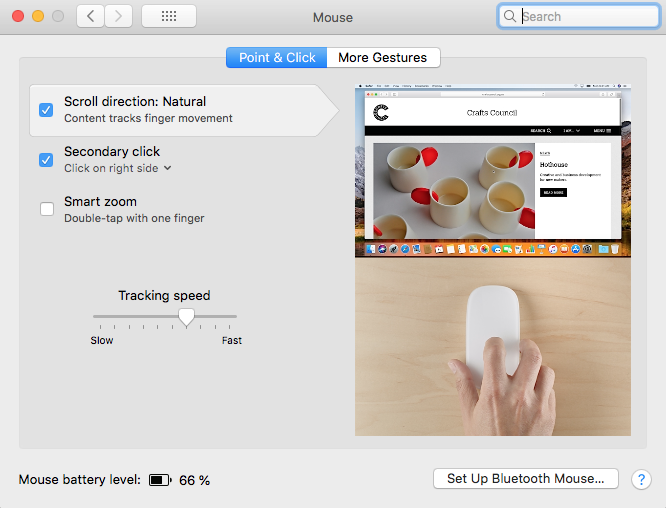
For videos explaining the different gestures you can use with mice and trackpads, go to System Preferences in macOS.
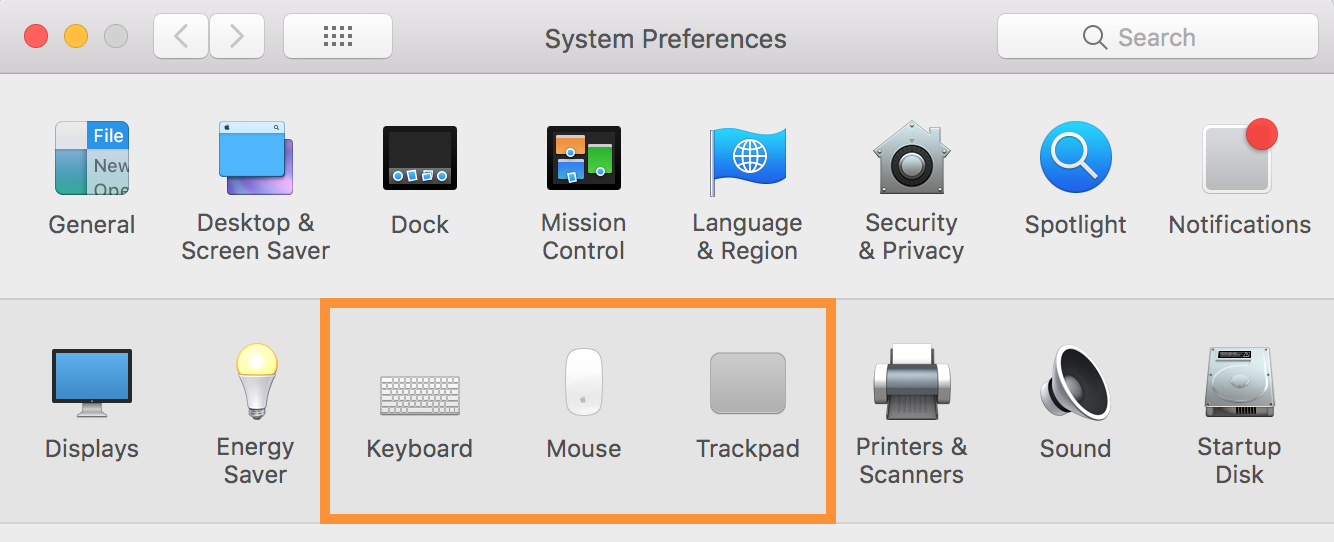
There you will also find options such as the secondary click (also known as the right-click in Windows).

In System Preferences → Trackpad under the Point & Click tab you will find options for controlling the input gestures for your trackpad.
Context menus
Perform a secondary-click to open context menus in Merlin Project Express. This provides you with additional options for the clicked content.
Move (Drag & Drop)
You can drag & drop content using your input device. This lets you move content with ease.
|
|
This function lets you create new groups, arrange the sequence of project content in the Outline, assign resources to activities, and create attachments. |
The procedure is always the same:
-
Select object(s)
-
Move the selection while keeping the mouse button held depressed
-
Drop the selection over an object by releasing the mouse button
Creating a group using »drag & drop«
New groups are created using this technique in Merlin Project Express. You can drag several activities and drop them on another activity.
The activity the content is to be dropped on will be highlighted in blue. Once you release the mouse button it will turn into a group (bold) automatically and the activities will become its child activities (indented).
-
Click a selection and keep the mouse button held depressed

-
With the mouse button held depressed, drag the mouse pointer to an object - in this example an activity (don’t release the mouse button yet)

-
Release the mouse button to drop the selection
Changing the project structure sequence
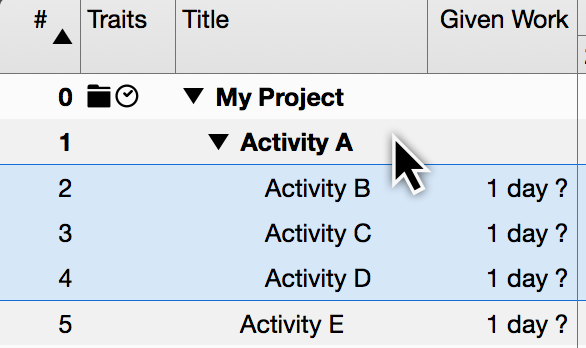
In Merlin Project Express, you can re-sort the sequence of activities, groups, and milestones. To do so, drag several activities and drop them between other activities.
When doing this, blue line with a circle appears to mark the position between the content.
-
Click a selection and keep the mouse button held depressed
-
Move the mouse pointer between two objects, in this example between "Activity A" and "Activity B", with the mouse button held depressed (do not release the mouse button yet)
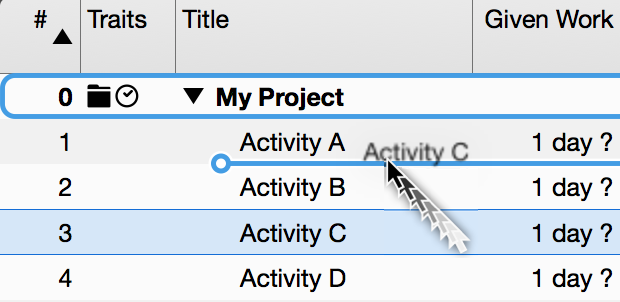
-
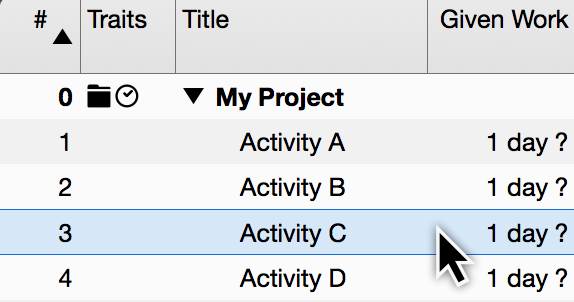
Release the mouse button to drop the selection

Activity C now appears between Activity A and Activity B.
Keyboard
The following keys are the important ones on a Mac for using keyboard shortcuts.
Important keys
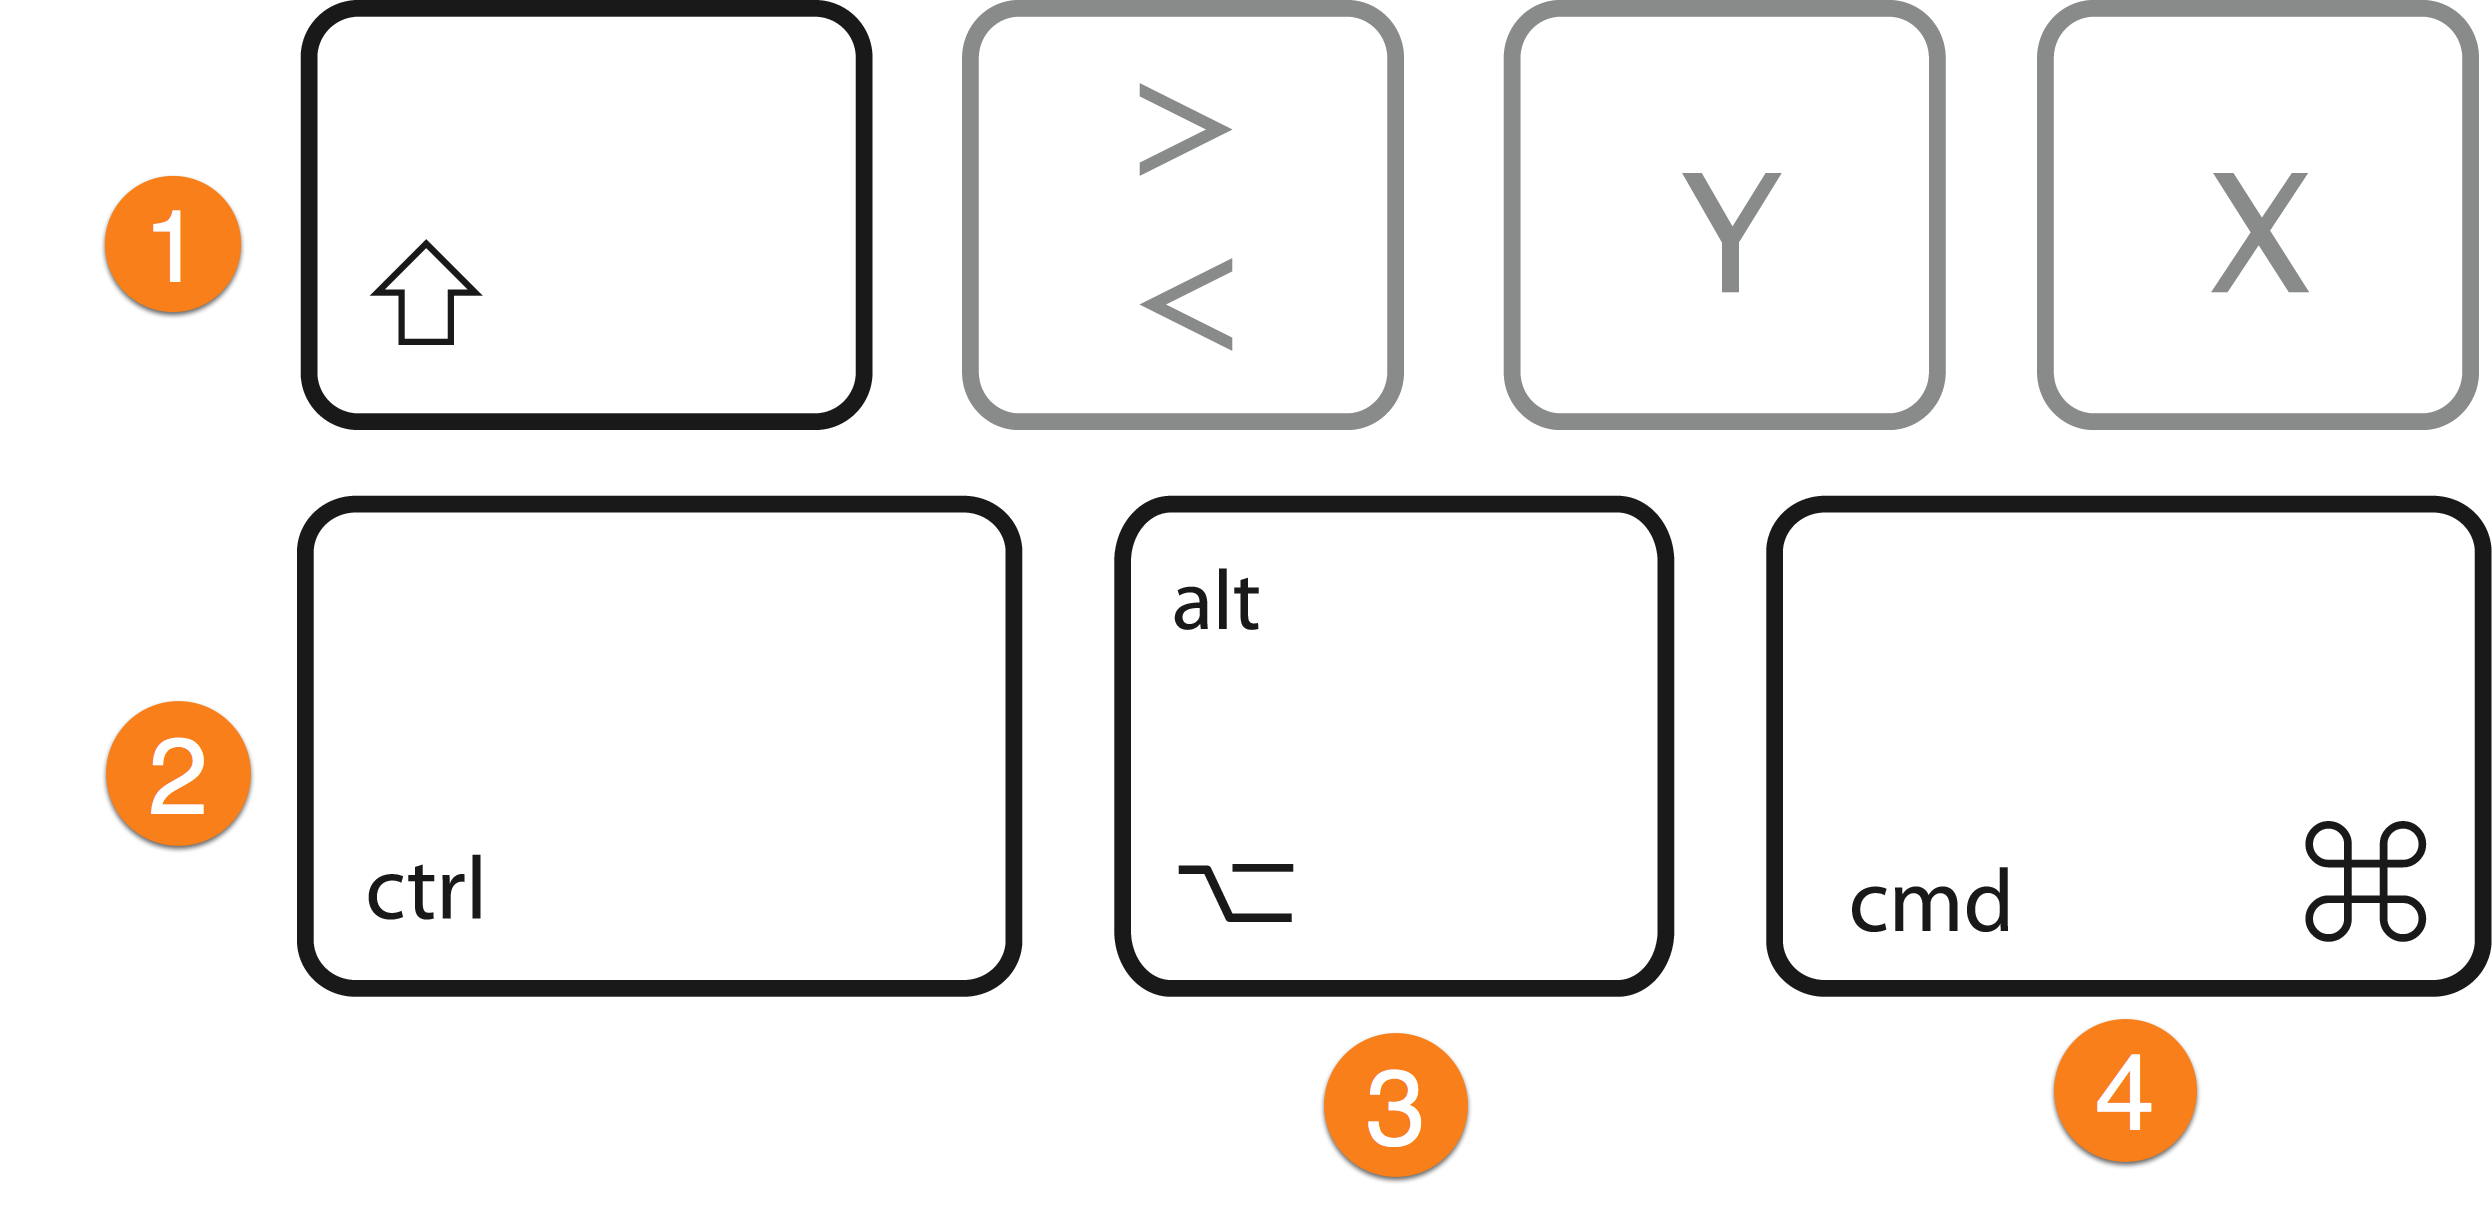
-
Shift key (shift) → upper-case key
-
Control key (control) → corresponds to Ctrl.
-
Option key (option) → corresponds to Alt/Alt Gr
-
Command (command) → corresponds to Windows
|
|
In the menus, the ctrl key is represented by the ^ icon. |
The command key is abbreviated to cmd.
For instance, the Enter/Exit Full Screen option under the menu item Window is controlled using the keyboard shortcut ctrl + cmd + F.
To edit content, the following keys are especially useful.

1.Delete key (backspace) → backspace key 2. Function key → (Function) → no corresponding key with Windows 3. Enter (Return) → Enter 4. Delete (Delete) → DEL
Keyboard shortcuts
Merlin Project Express uses a host of keyboard shortcuts.
Keyboard shortcuts consist of several keys pressed simultaneously, for example, saving projects is performed with cmd + S. F keys (F1,F2, etc.) are available on all newer Apple keyboards using the fn function key.
Most menu entries are provided with the corresponding keyboard shortcuts. They are located directly next to the individual menu entries. This lets you access these menu entries quickly and easily using the keyboard.
Scroll bars
Scroll bars are used to move the visible area in the program window.
System settings
|
|
The scroll bars and their behavior are controlled by the operating system. By default, scroll bars are only displayed in macOS when scrolling. |
The content in the different views of Merlin Project Express can be moved around the visible section using input devices such as a mouse or a touchpad. The scroll bars only appear when scrolling.
|
|
With the Apple Magic Mouse and the Apple Trackpad, you can watch short animated guides to using gestures to move content under System Preferences → Mouse and System Preferences → Trackpad. |
Displaying the scroll bars
Open the System Preferences in macOS and click the General icon. There you will find the options for displaying scroll bars when scrolling.

The three options for scrolling using the scroll bars are system-wide and apply to all programs used.
-
Automatically based on mouse or trackpad
-
When scrolling
-
Always
If you select Always, the scroll bars will then always appear in Merlin Project Express and in all other programs.
Appendix…
Traits column
Trait column icons
The Traits column contains various icons.
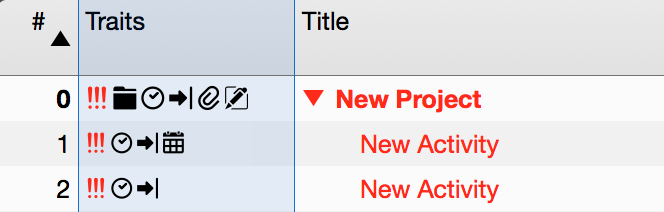
These icons result from different entries already made by the user in the project.
| Icon | Name | Meaning | Note |
|---|---|---|---|
|
Project |
Row #0 is the project row and is always marked with this icon. |
When projects are collapsed, the sub-projects are marked using this icon. |
|
Attachment |
This icon indicates that an activity includes one or more attachments. |
Groups, milestones, and assignments also support attachments. |
|
Alignment »ASAP« |
An activity, group, or milestone is aligned with an early start. |
This icon is only displayed with backward-planned projects. In a forward-planned project, all activities, groups, and milestones are assigned ASAP starts automatically. |
|
Alignment »ALAP« |
If an activity, group or milestone in a forward-planned project is aligned with a late start, this icon appears. |
|
|
Ellipsis |
This icon indicates that further information is available in the Traits column, but not all of it is visible. |
Change the column width to display all the icons. |
|
Calendar |
This icon indicates that the activity has a specified calendar. |
The selected calendar is shown in the »Advanced« options of the »Plan« tab in the inspector. |
|
Date |
This icon indicates that the activity has a fixed date. |
Use the »Plan« tab in the inspector to see any activity start or end dates entered. |
|
Note |
This icon indicates this item has a note. |
Click on the icon, it opens the »Notes« tab in the inspector. |
|
Resource Pool |
This icon means that the resource comes from a resource pool. |
|
|
Comments |
This icon indicates that this item includes one or more comments. |
NOTE: Comments are accessible only in Merlin Project. |
|
Unread Comments |
This icon indicates that this item includes one or more unread comments. |
NOTE: Comments are accessible only in Merlin Project. |
Planning conflicts
If logical problems occur during planning, planning conflict symbols appear in the Traits column.
| Icon | Name | Meaning | Note |
|---|---|---|---|
|
Planning conflict (weak) |
This icon indicates that the activity has at least one weak planning conflict. |
Click the icon. A »Notifications« window will open with a list of all planning conflicts in the project together with further information. |
|
Planning conflict (strong) |
This icon indicates that the activity has at least one strong planning conflict. |
In contrast to a weak conflict, a strong planning conflict prevents planning. This could be because the activity commences before the project starts. This issue will need to be resolved. |
Title column
The title column includes the titles of the activities, groups, milestones, and assignments. Two icons are used in the title column: one black and one light triangle.
The triangles indicate groups (black) and assignments (light).
Group
This icon indicates a group. Click the triangle to expand or collapse the group.
This allows you to show or hide all group content.
Assignment
This icon indicates that an activity, group or milestone has one or more assignments. Click the triangle to see the assigned resource.
|
|
The menu items Structure → Expand and Structure → Collapse let you expand or collapse several groups and assignments simultaneously. |
Given values
Given values are presets required for planning. As a project manager, you choose the presets based on your experience and other requirements for the planned course of the project.
Given values can be used to define work, duration, start and end dates, calendar and alignment settings for the respective activities in the project.
Insert a new column and type Given. Merlin Project Express will list all columns with Given values that are available for the project and its individual elements.
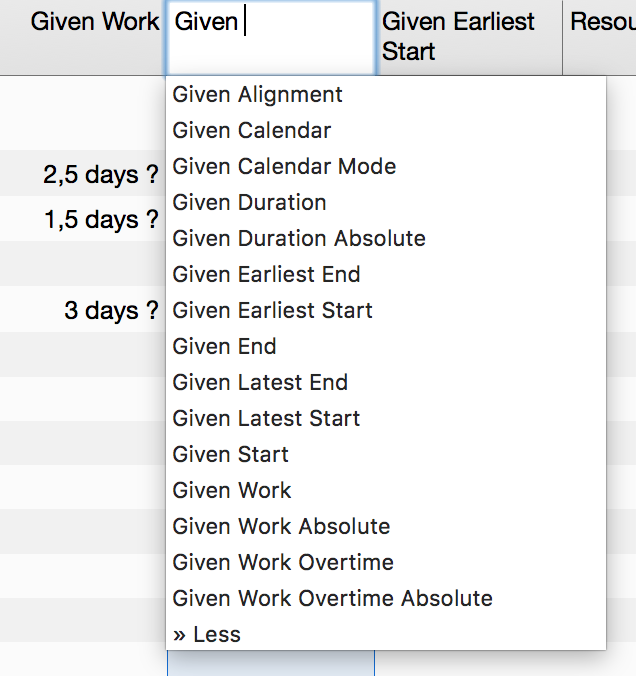
The Given presets for work, duration, start, and end are most frequently required for planning. They can be visible in the outline or hidden if not required. Most of the Given values are editable in the outline and the Plan inspector.
|
|
For dynamic planning, simply configure a preset for the work or duration and link the activities, groups, and milestones using dependencies. Merlin Project Express will then calculate the Expected values from the presets. |
Given Work
Per default new activities are created by a Given Work of '1 day ?'.
You can choose to show the value of Given Work in the outline and edit it there. The value of Given Work is also shown in the Work field of the Plan inspector, where you can also edit it.
Given Work Absolute
Given Work Absolute is a calculated value and cannot be edited.
You can choose to show the value of Given Work Absolute in the outline.
It calculates based on the value of Given Work. If you enter the Given Work as time duration, Given Work Absolute calculates the same value.
If you enter the Given Work as a fraction of the work, Given Work Absolute calculates the amount based on the Given Work defined in a higher level activity group.
Activity group is defined by effort of 10 days, thus Given Work 10 days. Child activity within is defined by 25% of the effort, thus Given Work 25% The Given Work Absolute of the child activity will calculate as 2.5 days.
Given Duration
Per default new activities are created by blank duration. That means, that the Given Duration column is empty and that Given Work value defines the duration of the activity as well.
To change the Given Duration of existing activities, select the activity row and use the Plan inspector to enter the desired value in the Duration field.
You can choose to show the value of Given duration in the outline and edit it there.
Given Start / End
Per default new activities are created by blank start or end dates. That means, that Given… date columns are empty and that dependencies or the date constrains and durations of higher level activity groups define the start or end of the new activities.
To set a Given Start for an existing activity, select the activity row and use the Plan inspector to select a Precise Start or End date.
|
|
For flexible planning and easier adjusting through-out your project’s life time, we recommend you define as less start and end dates as possible, and as many as absolutely binding to your deliverables. |
Given Earliest Start / Earliest End
Per default new activities are created by blank start or end dates. That means, that all Given… date columns are empty and that dependencies or the date constrains and durations of higher level activity groups define the start or end of the new activities.
To set a Given Earliest Start or Given Earliest End for an existing activity, select the activity row and use the Plan inspector to select a Earliest Start or Earliest End date.
|
|
For flexible planning and easier adjusting throughout your project’s life time, we recommend you define as less start and end dates as possible, and as many as absolutely binding to your deliverables. |
Given Latest Start / Latest End
Per default new activities are created by blank start or end dates. That means, that all Given… date columns are empty and that dependencies or the date constrains and durations of higher level activity groups define the start or end of the new activities.
To set a Given Latest Start or Given Latest End for an existing activity, select the activity row and use the Plan inspector to select a Latest Start or Latest End date.
|
|
For flexible planning and easier adjusting throughout your project’s life time, we recommend you define as less start and end dates as possible, and as many as absolutely binding to your deliverables. |
|
|
If you have to define for an activity all four date values (Given Earliest Start, Given Latest Start, Given Earliest End, Given Latest End) select the activity row and use the Plan inspector to select Between for Start and End dates. |
Actual values
Actual values are the values you enter to record actual progress of your planning. You update this information as often as new information from your resources arises regarding the actual work or the completion level of the various assignments.
Insert a new column and type Actual. Merlin Project Express will list all columns with Actual values that are available for the project and its individual elements.
You can choose to show or hide them from the outline. Actual values are editable in the outline and the Actual Values inspector.
An activity is defined by 2 days Given work. You want to update the activity to reflect 50% completion level.
-
You select the activity
-
Use the Actual Values inspector
-
You select the correct date for Actual Start
-
You select 50% from the Complete list
This means:
-
Actual Work calculates as half of Given Work, thus 1 day
-
Actual Start is the date you just entered
-
Actual End is blank (the task isn’t completely done yet)
-
Actually Completed Through calculates the date until current completion.
An activity is defined by 2 days Given work, which was recorded as 50% completed is now completed.
-
You select the activity
-
Use the Actual Values inspector
-
Click on 100%
This means:
-
Actual Work is now as much as the original Given Work, thus 2 day
-
Actual Start is the date set
-
Actual End is the date the remaining 1 day work would need to complete
-
Actually Completed Through calculates the date until current completion, thus the same as Actual End.
An activity is defined by 2 days Given work, which was recorded as 50% completed, is now 75% Completed but needs some 1 more day work as originally estimated.
-
You select the activity
-
Use the Actual Values inspector
-
Enter 75% in the Complete field
-
Check the value in the Remaining Work field
-
Adjust it from 4 hours to 12 hours
The overall activity will be adjusted and the new completion percentage will be calculated. It is now 100% * Actual Work / (Actual Work + Remaining Work) = 50%
This means:
-
Actual Work was originally 75% of the original Given Work, thus 1.5 days
-
Actual Start is the date set
-
Actual End is blank (the task isn’t completely done yet)
-
Actually Completed Through calculates the date until 75% completion was achieved.
Expected values
Expected values reflect both Given and Actual values.
Expected values are read-only and you’ll find them in the Plan and Actual Values Inspector.
When an activity is not yet started, expected values reflect the Given values.
When an activity is started and actual values are entered, expected values reflect the Actual values.
An activity requires 2 days Given work. It is not yet started.
This means:
-
Expected Work calculates as Given Work, thus 2 days
-
Expected Duration calculates as Given Duration. If Given Duration is empty the duration it needs according to the Given Work and defined assignments.
-
Expected Start calculates as Given Start. If Given Start is empty, the date it can be scheduled due to dependencies to predecessors or higher level groups.
-
Expected End calculates as Given End. If Given End is empty, the date it can be scheduled to end due to dependencies to predecessors or higher level groups and its defined duration.
An activity is defined by 2 days Given work and by 50% completed.
This means:
-
Expected Work calculates as Actual Work plus Remaining Work, thus 2 days
-
Expected Duration calculates as the duration until 100% completion.
-
Expected Start calculates as Actual Start
-
Expected End calculates the date until 100% completion
An activity is defined by 2 days Given work and as 50% completed, remaining work was updated to 12 hours. This recalculates a complete of 40%.
This means:
-
Expected Work calculates as Actual Work plus Remaining Work, thus 2.5 days
-
Expected Duration calculates the duration until 100% completion
-
Expected Start calculates as Actual Start
-
Expected End calculates the date until 100% completion of the new Expected Work
An activity is defined by 2 days Given work and as 40% completed, Actual work was 1 day, Remaining work 12 hours. The activity was completed by a click to '100%'. This recalculates Remaining work to blank value, its amount will be added to the Actual Work.
This means:
-
Expected Work calculates as Actual Work plus Remaining Work. Remaining Work is now 0, Actual Work is 2.5 days. That means Expected Work is 2.5 days
-
Expected Duration calculates the duration until 100% completion
-
Expected Start calculates as Actual Start
-
Expected End calculates as Actual End
If you have defined cost rates on your resources, base or attachment costs on your activities, the Expected Costs will show up in the Finance inspector in the Balance tab.